Fermentation - Sauerkraut!

For the last few months I've been really excited by the process of making fermented foods, and how I can introduce what I've been working on into our diets.

For those of you not yet in the know, fermented foods such as kefir milk, sauerkraut, and kombucha tea have a whole gang of great bacteria in them which aid digestion and offer a huge range of other health benefits to boot.

In the past the guts in our family have been in a sorry state. We have three with gluten intolerance, one with a wheat/egg allergy, two with lactose intolerance, and one who has behaviour issues after eating some foods. We've all had numerous doses of antibiotics, and unfortunately the first two years of our wee boy's life were spent dosing him up with various different things in order to keep him functioning.

I'm convinced that we could all benefit from sorting out the bacteria in our guts. There are loads of different (some quite extreme) diets out there addressing the link between the gut and psychological/physiological symptoms but with our already restricted diet I'm not prepared to dive into anything like that without some proper testing first. What we are doing, is having a go at making and eating some fermented probiotic rich foods.

Today I thought I'd write a few words about sauerkraut.


What is it?
Sauerkraut is basically fermented cabbage. It has a pickled, slightly sour taste that goes great with cold meats, sausage, corned beef and cheeses. If you like pickled onions or gherkins you're going to love sauerkraut!

How do you make it?
It's made by grating cabbage finely, rubbing salt into it, then letting it sit under a weight until it bubbles and ferments.

How does cabbage turn into sauerkraut?
The magic happens by a process called lacto-fermentation. The cabbage has a natural amount of beneficial bacteria on its surface and when you submerge it in brine (salty water) the bacteria converts the natural sugars in the cabbage into lactic acid, which naturally preserves the vegetable content.

How long does it take?
You need a minimum of three days to make one jar, longer for a big crock of it.

Why should I eat it?
Sauerkraut contains many of the same probiotics as a bowl full of yoghurt, but without the dairy - which is great for the lactose intolerant amongst us. It's great for your tummy and it's really yummy too!

Can't I just buy it?
Sure! There are some great brands of sauerkraut on the market. I like Eden Organic Sauerkraut because it uses organic cabbage and only contains cabbage, salt and water - just like it should. It has a yummy tangy taste that's not too strong. It's also $7 a jar from my local co-op - which is why I'm interested in making my own.


With home made sauerkraut you can control the flavour by testing pieces and taking bottling it when it suits your taste buds. You can add spices to it, use red cabbage... there are lots and lots of options when you do it yourself.

What do I need to be aware of?
As with all fermented food,  you need to be aware of hygiene. Keep your work surface, hands and jars super clean. 

When your sauerkraut is fermenting you may see some bubbles or white foam come to the top - that's normal. It may even bubble over - so it's important to use a big jar and put a plate underneath to catch any spills.

If you get any mould on the top it may be because you've put your jar in a place that's too hot. You can scrape the top layer off and keep going - the lactic acid is a powerful preservative. If anything looks very dodgy, smells bad, or if there is any fur growing in it use your best judgement. It may be best to start again.


For more info on recipes and the process of making sauerkraut check out:

Wild Fermentation
The Kitchn


Blue Mountains Vintage Trail

An Insider’s Guide to finding bargains in the Blue Mountains

Whether you’re looking for clothing, retro homewares, a piece of mid-century furniture or that last elusive item to finish off your collection, the Blue Mountains is the perfect place to spend a day exploring the many vintage stores on offer.  Follow me on my perfect day out doing the ‘op shop hop’ from Glenbrook in the Lower Mountains to Blackheath at the very top.


  Blue Mountains Australia
  • Start at Glenbrook village, the gateway to the Blue Mountains and just 10km west of Penrith. Fuel up with a coffee at one of the many quirky cafes such as Jazz Apple or the recently opened 2773. When you’re ready to hit the shops stroll down Ross Street to the local Vinnie’s where you’ll find a small thrift store that has a good selection of clothing and homewares. On your way back up Ross Street make sure you check out Frippery, an op shop that specialises in vintage clothing.

  •  Heading west up the Great Western Highway to Blaxland you’ll find Vinnie’s on the main road. If you park behind the shops you’ll see that this Vinnie’s has an extensive furniture section downstairs with some great bargains to be had. Upstairs you’ll find clothing, manchester, homewares and jewellery. Back out on the main road there is a small Bibles for Missions op shop where prices are cheap and there are many treasures waiting to be discovered. Make time to stop for a chat with the friendly and knowledgeable volunteers.
  •  The next stop is Springwood where a newly opened Salvos has a large range of clothing, kitchen items and electronic goods. Stop in the shops for a snack or head straight to the Vinnie’s on Macquarie Road.

  • It’s time to make our way to Katoomba where we’ll be spending a couple of hours visiting some of the best op shops in the mountains. Start at Salvos located on Waratah Street down a steep driveway. There are often great furniture sales at this store as well as a good range of clothing, shoes, kitchen items and linen. Keep walking down Waratah Street and you’ll come across Vinnie’s which has an upstairs area full of linen and craft items as well as a separate room for furniture. Just past Vinnie’s is the Cat Defence Charity Shop, a small thrift store bursting with vintage homewares.  Head back up Waratah Street towards Katoomba Street where you’ll find an abundance of cafes and restaurants. This is the perfect place to put down those shopping bags and take a break over something good to eat. Suitably refreshed, take a stroll up Katoomba Street visiting the many antique shops along the way. One of my favourites is Macarthur Arcade which boasts a huge selection of vintage homewares and mid-century furniture. Once you reach the top of Katoomba Street carry on past the round-a-bout to Bathurst Road where you’ll find the Boutique Op Shop. This op shop is a recent addition to my regular hit list. I love the care the staff take in displaying their items and the great range they have on offer.


  •   The last stop on our Vintage Trail is Blackheath just west of Katoomba. Start at the Vinnie’s just across the railway tracks before walking down Govetts Leap Road to the Victory Theatre Antique Centre and CafĂ©.  This enormous antique shop contains two floors of homewares, clothing, jewellery, furniture and porcelains and more. There is always something wonderful to discover here. Finally, pop in to one of Blackheath’s many cafes for one last top up before heading home, hopefully with your arms full of vintage finds! 

Trail Notes
·       Most op shops are closed on Sunday so make sure to check the opening hours online before you plan your trip
·       Carry some cash with you as many op shops don’t accept cards
·       All of the shops listed in this guide as located close to Railway Stations so you can utilise public transport


A New Year and Some Sewing

Happy New Year!

I've started the year with a spring clean, updating photo albums, editing my end of year home movies and very little sleep.

In November I took a solo trip to Ubud in Bali for a week. My goals for the trip were to eat, sleep, go to the spa and buy fabric. A perfect holiday! I took a day trip to Denpasar to the fabric markets and brought back lots of lovely stuff. I also couldn't help myself and ended up with 11 sarongs.. but those are slowly getting turned into clothing or things for the house too. I made up the pattern for the shorts in the bottom picture but there are plenty of free PDF patterns about on the Internet. These ones are very simple with just a zipper up the back, and they're quite high waisted. I used the rest of the fabric to make Jemima a pair, but hers are below the knee and wide in the leg.

I have a few sewing projects on the go at the moment, and all going well I'll have some time to photograph them and upload them here soon. Have a lovely day everyone.


What the Bush Fires Taught Me.


When my son was younger I used to point to the sky and cry “Helicopter! Helicopter!” whenever we heard the beat of propellers pulsing overhead. His little face would peer upwards and he’d smile at the amazing flying machine in the distance. Ever since the Springwood bushfire hit the Blue Mountains last Thursday afternoon, we have heard helicopters roaring through the sky almost constantly. The sound is there when we go to sleep, when we wake in the night, when we open our eyes in the morning. These days, I’m trying to distract my two children from the sight of the helicopters rather than point them out.

When we moved to the Blue Mountains from Wellington in 2010 we felt a strong pull to the region like so many others from different parts of Australia and the world. We loved the beautiful bush, the gaping gorges, and the strong community spirit. We knew that we lived in a bush fire zone, but coming from the land of damp cool forests we were completely unprepared for what a spark can do to tinder-dry Australian bush.

The past month has been uncharacteristically hot and windy. When we should have been enjoying the first warm days of spring we’ve been sweating through 35 degree + days instead. Day after day gale force winds have knocked over trees and sent dust flying. More than once I’ve heard people talking about the possibility of a “bad fire season”. By the beginning of October the grass was brown and crispy to walk on. The fruit trees in the backyard sagged in the heat and the leaves turned brown. We closed the curtains to block out the heat and quietly wondered what on earth summer would be like if this was what we had to contend with in spring.

Thursday 17th October was just another hot day. I dropped the kids off to school that morning with reminders to drink lots of water and stay in the shade. The wind picked up at around lunch time and I remember thinking that I should probably keep an eye on the rural fire service website just in case. Just after 2pm I was sitting at my desk in my home office, enjoying my last few moment of child-free work time. I happened to have the fire update webpage open and when I glanced at it I was horrified to see that an out of control fire was burning a mere 3 km from the children’s school. Although our school wasn’t in immediate danger, I made arrangements for them to be collected early knowing that if it got worse I might not be able to get down the highway.

On the road heading home from school

Within half an hour the roads were congested with traffic, streets were blocked off and fire engines roared up the mountain highway. Helicopters and water bombing aircraft began circling overhead. A line of cars snaked along the highway, the drivers craning necks out of windows to get a better look at the direction the smoke was coming from. Nearer the school, frantic parents abandoned their cars on the side of the road and ran.  At the school gates parents looked each other in the eye and gave one another a solemn smile as they hurried their children away through the smoke. As I drove back up the mountain towards home I passed 15 fire trucks parked on the side of the road with their sirens blaring and lights flashing in unison. My daughter mistook the white and yellow painted trucks for ambulances and burst into tears. In the other direction cars were streaming down the highway away from the fire, their boots packed high with sleeping bags, pet carriers, pillows and bags.

The sky was like this for days. 

A char grilled cicada blown into our yard. We also had burned leaves and sticks floating around and lots of dead bugs.

We left that afternoon, then returned, then after a few days of anxiously checking the rural fire service website we left again yesterday (along with most people in the mountains). We’re not out of the woods yet. As I’m typing this, the wind is picking up outside and the fire near us is still burning. I feel safer now that I have in days though, I think the absence of smoke and aircraft overhead has a lot to do with that.

Now that we’re home again, it’s given me a chance to reflect on the events of the last week. I like lists, so I thought I’d compile one here.

What the Bush Fire Taught Me.

  1.  When you’re living with a potentially life changing threat hanging over you, the rest of your life doesn’t stop. The kids still want breakfast, they still fight over who gets to hold the remote, work still gives you deadlines and the dishes still need to be done. Dealing with that when tired and stressed is hard.
  2. The sensory things – the smoke that gets into your hair, your skin, your clothing and the sound of the water bombing aircraft will be at first interesting, then quickly become tiresome and very stressful indeed.
  3.  We should have been more prepared. I will know where my wedding negatives are from this day forward. I'm glad I had time to video our things for insurance purposes. I can't imagine trying to remember every little thing we own. 
  4. Choosing what to pack and what to leave is heartbreaking and kind of surreal. We left yesterday genuinely believing that we may not see most of our possessions again.
  5. Even if you shield your children from images in the media, they will feel that something is wrong. Talk to them and give them “just enough” information. If they want to ask wacky or inappropriate questions let them. We told the kids that there was a fire in our area and we were leaving to have a break from the smoke.
  6. If you have an allergy kid like I do, please make sure you know where your medications are and keep some special foods ready in case of an emergency.
  7.  You might find yourself concerned with stupid things in the middle of a crisis. For example, when I was packing up I thought about the fact that I’d just organised my pantry and put pretty labels on all of the jars. I didn’t want to have to do all of that again!
  8.  The rfs are incredible, selfless and amazing people.
  9. The power of community is humbling and beautiful.
  10. I won’t ever take the fact that we live in a bushfire zone for granted again.

A Star Wars Party

Yesterday we celebrated our son's 6th birthday with a Star Wars themed party. He only recently discovered Star Wars, but being the sci-fi fan that he is it was love at first sight. As always, the party was done on a budget with lots of home made elements.


The invitations were designed by Benny's Uncle and printed at a local print and copy shop. Ben absolutely loved them.


I made each young Jedi a costume which sounds arduous but I made it easy on myself by deliberately choosing a non-fray fabric so I didn't have to sew much. The brown robes were a basic rectangle with a v neck hole cut for the head. I then sewed on a rectangle of calico for the names and made a calico tie for each robe. All up the costumes were around $20 for 10.

As well as a Jedi robe each guest chose an inflatable light saber. I found them on eBay for $1 each.


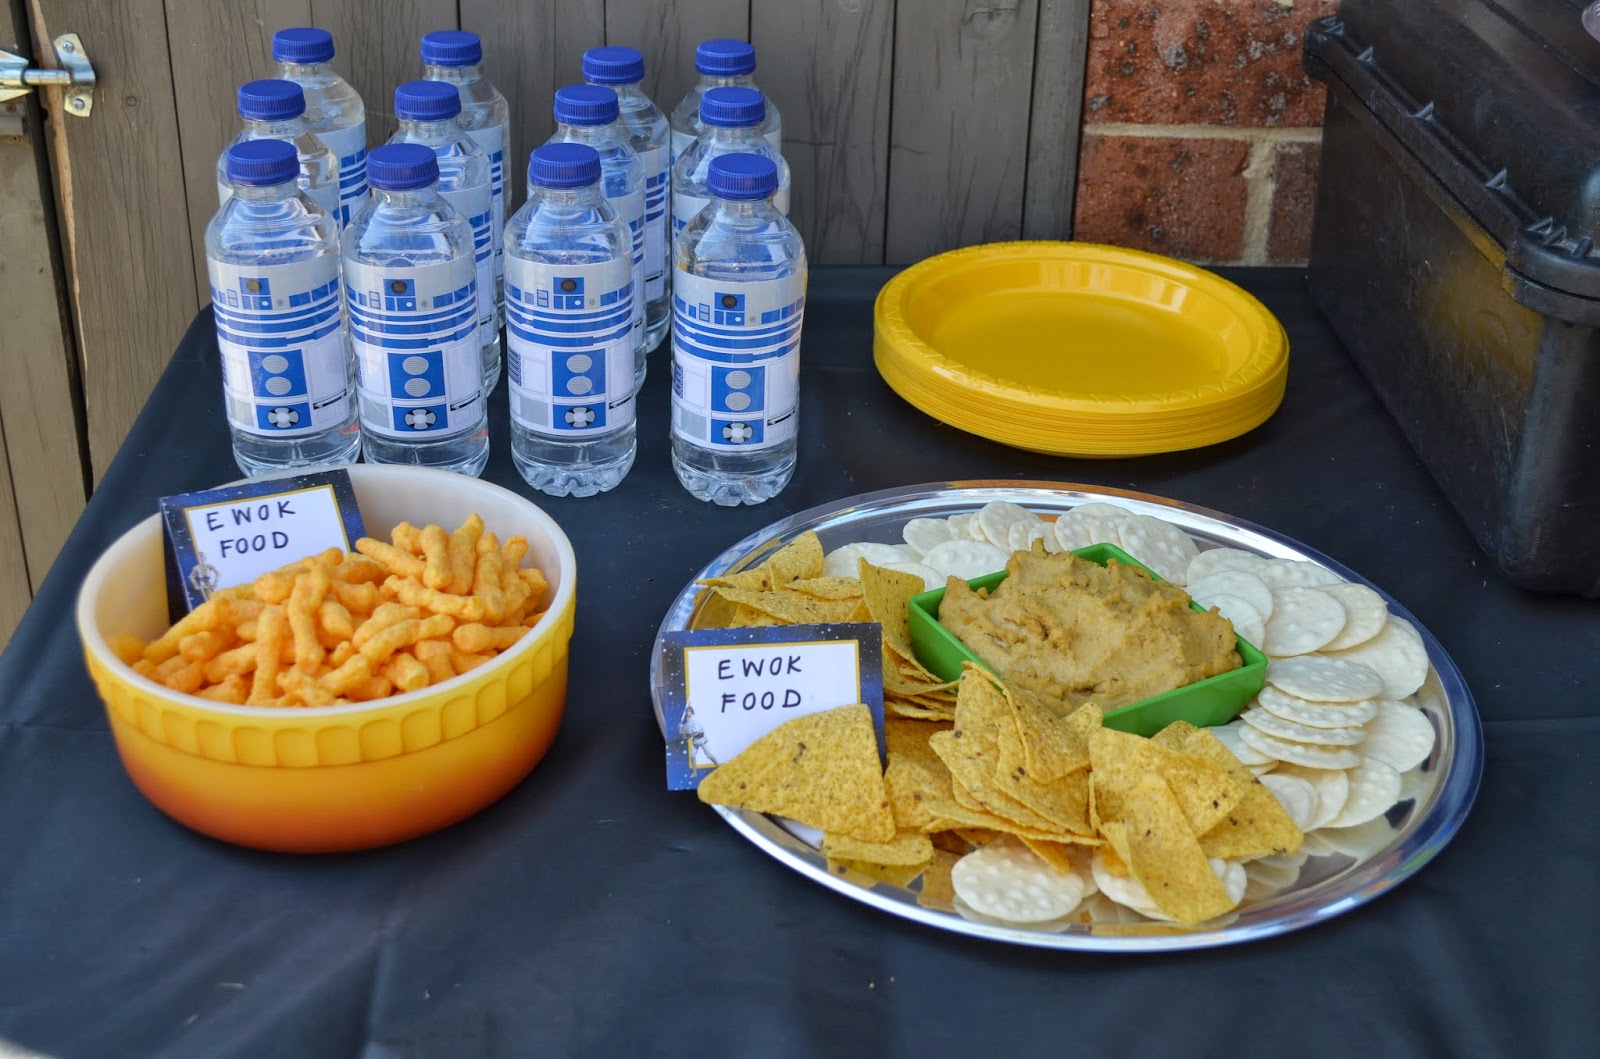
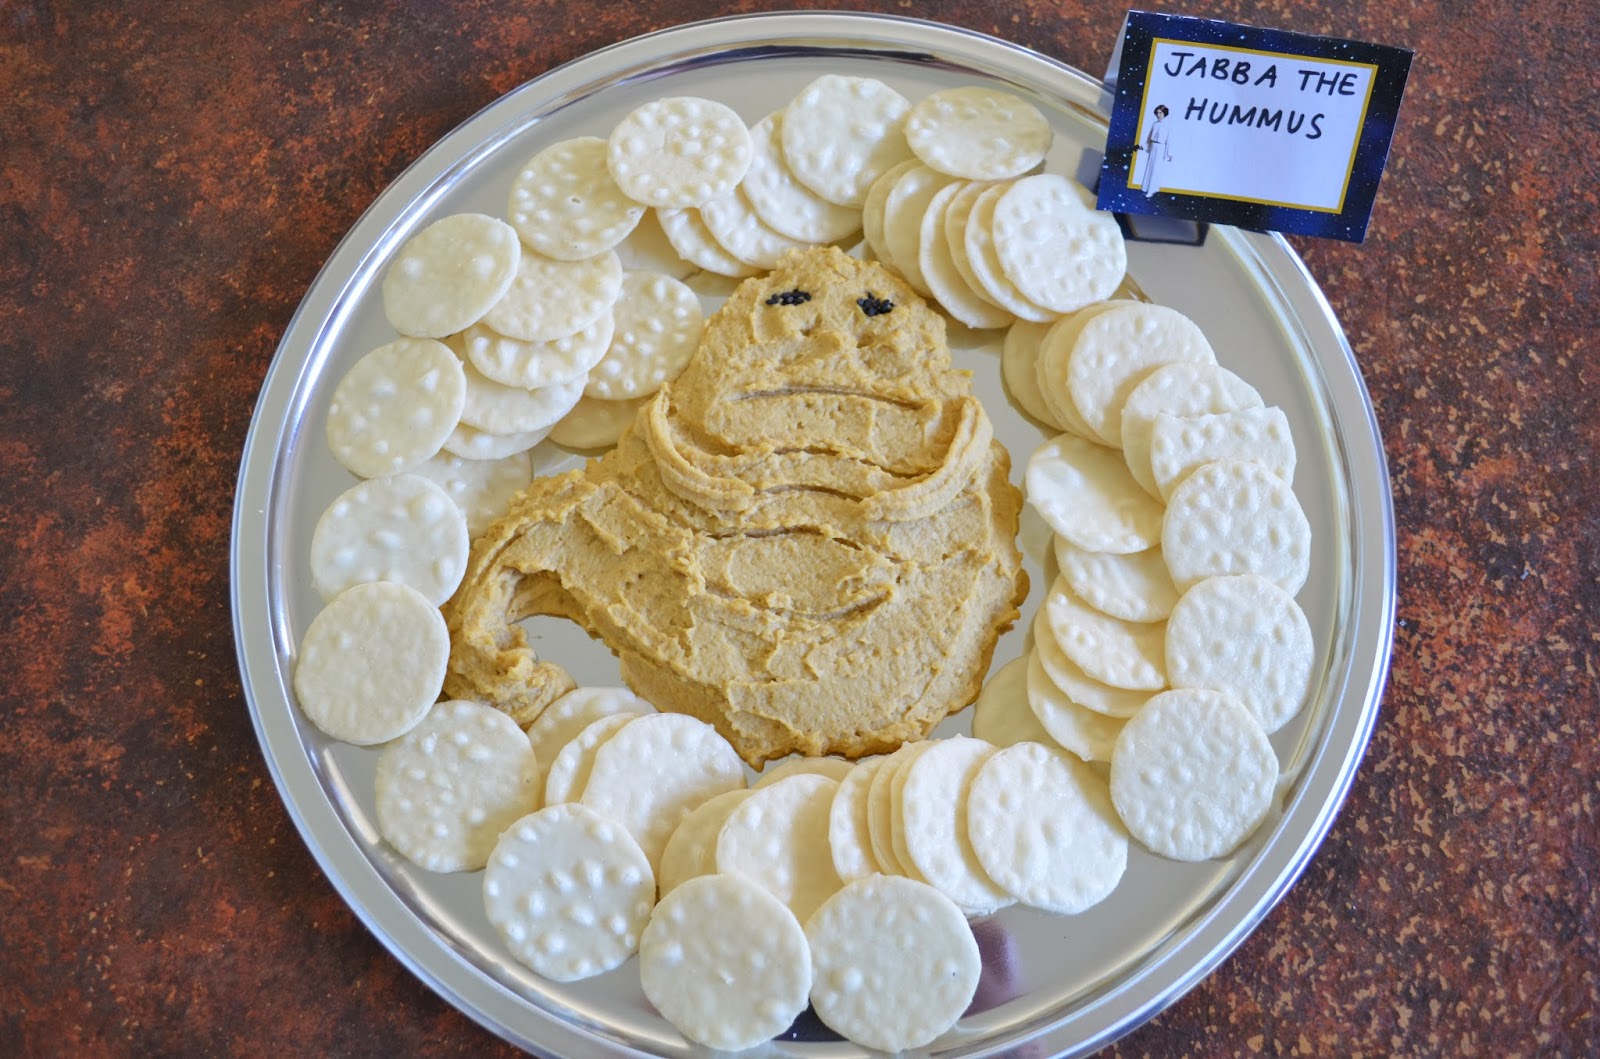
The party was an afternoon tea so it was mainly just finger food. Everything was gluten and egg free so the birthday boy could eat to his heart's content. We had Ewok Food chips, Jabba the Hummus, R2D2 water bottles, grape light sabers, padawan mini pizzas, Wookie cookies and Han Solo jelly.


The activity of the day was the Jedi training course which was run by my husband the "Jedi Master". The kids practiced with their light sabers, jumped over some rocks in our backyard, balanced along a bench seat, defeated the storm trooper balloons and tackled the crepe paper laser beams. Throughout the day we had 4 tracks from the Star Wars movies playing which really helped make the day exciting for the kids. I downloaded them from itunes for $1.60 per track.


At the end of the training was the final test. Could the Jedis defeat Darth Vader himself? The Jedi Master did a quick costume change and there was much excitement as he snuck around the corner of the house.  


After eating we had Pass the Parcel and then the Pinata. We made the Death Star Pinata by covering a beach ball in paper mache. My husband painted all of the detail on and even though it was a bit thin (I blame GF flour) it lasted through all of the kids before it broke open and the treats spilled out.


The goodie bags were brown paper bags I bought for .40c each at a packaging store with a print out I made stuck on the front. Inside were some space stickers ($1 a sheet - I bought two then cut them into 10 portions), some Star Wars colouring in pages, a bubble wand light saber, their Jedi Training Certificate and their costumes and inflatable light sabers from the party.


Ben had a vision for his cake right from the start and he couldn't be talked out of it. He wanted Darth Vader's severed hand in a black glove, with wires hanging out the back. As you know, he's gluten and egg free - so making any kind of cake is a challenge let alone a hand! My amazing sister pulled it off though. The hand is melted chocolate and lollies which was set inside a food friendly latex glove and then covered in home made fondant. Just before the party she brushed over some more black food colouring to give it a shiny leather glove look. The cake it's sitting on is a GF packet chocolate cake with buttercream icing made with DF margarine.


As well as the Jedi costumes I made a C3PO costume and a Princess Leia dress and belt (using a sheet and a nightgown pattern). The party was so much fun, the kids had a ball.

Resources

Jedi Certificate and food labels were downloadable PDFs from Etsy
R2D2 labels were adapted from these cup labels 
The light sabers were bought on eBay for $1 each
The goodie bags and silver plates were from a bulk packaging shop
The tablecloth, plates and napkins were from a party shop

The key to creating a cool Star Wars party on a budget is start early! I started around 3 months ago by looking on eBay and Etsy now and again for things I thought I could use. By starting early I had time to have things like the light sabers sent from overseas and I could pace myself with the costumes. If I'd left it to the last minute I probably would have bought some branded Star Wars party stuff, which is hideously expensive. Lots and lots of time to ease into it is the way to go - it allows you to enjoy the party planning process without the panic.

This party was around the $100 mark for 12 kids, including the food. 


LinkWithin

Related Posts Plugin for WordPress, Blogger...