Showing posts with label Photos and Art. Show all posts

43. Salvaged Wood Art Display


If you have children, you have a lot of drawings and paintings. Kindy mums I know you understand what I'm talking about. I love the artwork my kids create but sometimes wondering what to do with it all can be a little overwhelming. We already have a pin board and the fridge covered and it feels a little heartless to throw such precious work away. So what's a parent to do?


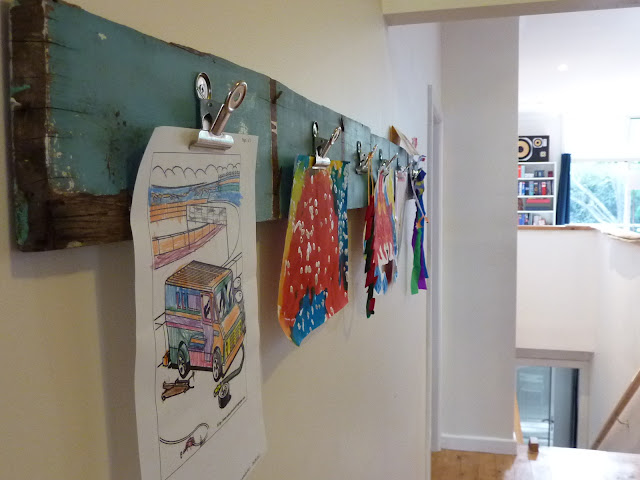
A few weeks ago Mr J and I were on a date at a Junkyard (oh yes, you read that correctly) and we came across this great painted piece of old wood. I had an idea for a place to hang the kids art and certificates and this wood was just about perfect. We bought it for $5 and threw it in the back of the car.


The only issue with the wood was that I wanted a long thin piece and this one was short and wide. We were going to saw it in half but in the end Mr J gave it one almighty kick and it split just where I wanted it to. Nice.


We needed 6 metal 'letter clips', we recycled four of them and bought another two for $1.20 each at a stationery shop. The clips work really well because you can change what art you're hanging quickly and they don't damage the drawings.


The clips are secured to the wood using a drill and screws. We left all of the old nails and rough bits on the wood because we liked the look of it, but if you plan for this to be within reach of little hands make sure it's smooth first.


We used removable velcro mounting strips to hang the wood on the wall.


The kids loved seeing their work displayed on the wall for everyone to admire. Jemima brought home a merit certificate from school and that was promptly added to the mix. Ben will add something tonight no doubt, as he spends a couple of hours drawing each day.

So that's our Art Display made from salvaged wood. Total costs were under $10 and it took about two hours to put it all together.

Have a great Friday everyone!

39. Family Values on Scrabble Board


For a while now I've been on the look out for an old Scrabble board game with wooden tiles. I've seen lots of craft ideas using them from jewellery to coasters, but what I had in mind was a little different. Around 3 weeks ago my husband spotted one at a Blue Mountains Salvation Army store for $4 - exciting! There's nothing like finally finding that elusive item on your op shop wish list.

That night once the kids were in bed we got to brain storming about our family, our children, who we are, and who we want to be. We wrote down all of the words that fit us as a family then there was the fun part - trying to get them all onto our Scrabble board using the tiles we had. Once we had it right, we took some photographs before putting it away in a box ready for the moving truck.


Last weekend a sufficient number of boxes were unpacked to allow me to revisit my Scrabble project without feeling too guilty. Here's what I came up with:


27. China Plate Frame


Time: 15 minutes
Cost: $5 or under


Materials:

1 china plate - look for one that is flat in the middle rather than one with a raised ridge because it'll be easier to place your photo
1 photo
Glue
Clear varnish and brush
Scrapbook letters (optional)

Here we go...

This is a quick and easy project that you can make for very little money.  I picked up this Italian blue and white side plate for $1.50 in an Op Shop today and I decided to make it into a photo frame.


Give your plate a really good clean before you start.

Choose your photo and find a circular object to use as a template. Cups and small bowls work well. Hold you photo up to a window pane face down and draw around your template. By drawing on the back of the photo you'll avoid any pen marks in the image, and the window will help you to place the circle in the right place.


I cut a circle out of paper to put behind the photo, but you could skip this step if you wish.

Glue each layer together, then glue the photo onto the plate. Measure so that you have the photo right in the middle of the plate.


Place your letters around the frame and glue them down. Use a cotton bud (q-tip) to clean up any glue around the letters.


Give the whole thing another wipe to remove any dust or fingermarks.

Take the plate outdoors or open some windows then give the whole thing a coat of varnish.


At this stage you could tape some wire onto the back so that you can hang it on the wall, or use a cute plate display holder on a shelf.

Other ideas to try:

A vintage floral plate with an old photo or cut out from a retro magazine
Bright coloured plate with photos of your kids. Put hand or finger prints around the plate before varnishing.
Make a matching set for Grandparents or for Mothers Day.
Choose an image you love from a postcard, magazine, or poster and match one of the colours in the image to the plate.
Experiment with other things to glue around the edge - buttons, gems, twine spelling out words.. . you're limited only by your imagination.

Happy crafting everyone!

18. DIY Photo Canvas Prints


I'm really excited about this project. Over Easter my good friend Jo over at beaux design told me about a new painting technique she'd heard about using gel medium. I've been thinking about it over the last month or so and this is what I came up with this weekend.

Everyone I know (including me!) loves canvas prints of their favourite photographs. But they're very expensive. I had a look at some photo ordering sites online today and they ranged from $50 to well over $300. I can see the value for a wedding photo perhaps, but as an everyday craft project it's way too costly.

I started to have a play with photos and did my research on gel medium - and I think you'll like the exciting discovery I made.  Let's have a look.

Cost: $5 or under depending on canvas size
Time: 15 minutes to apply plus drying and time to remove paper

Materials:
1 canvas from a discount store or art supply shop. Mine was 20cm x 20cm and was $2.50
Matte gel medium from an art shop. Mine is Matisse and was $13.95, another brand is Liquitex. One pot will do for many projects.
1 inkjet printed or photocopied (toner only) image in colour or black and white
Paintbrush

Here we go...
For my first attempt I wanted to use a photo of my daughter and I. I uploaded the photo onto the site Photobucket then edited it. All I needed to do was crop the picture into a square shape then choose the "Pop Art" option under Effects. This is what I ended up with. There are lots and lots of different options to choose from so there's room to try out a few different looks to see what you like.


Next I downloaded the image to my computer and pasted it into a Word document. I resized it so that it was just bigger than my canvas and printed it out on the best quality setting. An important note is that your image will be reversed because you're placing it onto your canvas face down. This is particularly important with text. You can flip your image in photo editing software (like Photobucket) or most printers have the option of printing in reverse. For a larger canvas get your image enlarged at a photocopy store but make sure it's a toner print rather than laser.


Time to open up the gel medium! Using a sponge or a brush apply a thick, even, coating to the entire surface of the canvas. No blobs allowed. Every part must have gel medium applied or the print won't adhere.


Place your image face down into the canvas, being careful to position it where you want it.

Using a roller, credit card, or plastic ruler, smooth out any wrinkles and bubbles. It's really important to get the paper as smooth as possible at this stage, but be gentle because you don't want to rip the paper.


Once you're satisfied, leave it to dry for at least 10 hours. For my second one I cheated and dried it in the sun for 2 hours then popped it in front of the heater and it still worked.


If you see a section where the print hasn't come through enough you can apply some more gel medium onto the back of the paper and it will seep through and react with the ink.

When the paper is completely dry, spray some water onto a small section and gently rub the paper away. Work in small areas at a time until all remnants of paper are gone and your print is nice and clean.  This is time consuming.. I'm the first to admit it. But it's something you can do in front of the TV or do a little bit then come back to it later. I used my finger mostly but a clean cloth also worked really well.


That's it! A home made canvas print for as little as $5.


As you can see in my finished canvas above there are a few white bits here and there. I'm still experimenting with the right type of paper and the amount of medium to spread on the canvas so I'm hoping to tweak it a little in the next few days. I kind of like the distressed look though so I'm not too worried, and for around $5 for a 20cm x 20cm canvas I'm happy with the results.

Hindsight
Here are my tips for making this project work really well for you:

  1. Use a good quality, strong, preferably coated printing paper. And remember this works with inkjet (not laser) printers.
  2. Give the canvas a good, thick, coating of medium. Below is a pic of my first attempt where we hadn't used enough product and the image didn't bond well.
  3. When you're peeling off the paper, dry it periodically so you can see where small bits of white paper remain.
  4. For a longer lasting and tougher canvas finish it in clear varnish or enamel.


If you're a fan of Andy Warhol inspired artwork check out this great easy tutorial using photocopied images and food colouring from artist Jo Stanes over at  beaux design pop art project.

Happy Crafting!!

3. Matchbox Keepsakes

Time: Under 1 hour
Cost: Under $10


Have you ever popped a pretty shell in your pocket while walking along a beach?

If you're like me, you have a bowl of "keepsakes" that you can't get rid of, even if you haven't looked in there in months. Included in mine is a piece of plastic from a car headlight, salvaged after my husband, then 16, crashed his first car; a piece of black shiny obsidian rock from Auckland's One Tree Hill, collected while picnicking on a bright spring day; some Beado's that my daughter has made me as a gift; and a little grey shell that my mother in law gave my daughter on our summer holiday in Port Macquarie.
These little memories deserve better than a dusty bowl on a shelf. This project will show you how to display your treasures and record your memories, and it's so easy to do!

Materials:

Bulk pack of matchboxes - small or large or a collection of both. Around $5 from the supermarket.
Glue
Collection of nick knacks
Photos, magazine pictures, maps, and pretty papers to cover your boxes
Tissue paper (optional)


Here we go....


Arrange your nick knacks in front of you and match up any photos, pictures, maps, or postcards to each little treasure. Try to have something that makes you think of the memory that will be hidden inside the box.
Empty out the matches into an airtight jar and reserve at least one box so that you can use it to strike the matches leftover from this project.
Place your matchbox on top of the material you will be covering it with and trace around it with a pencil. Cut out the rectangle and glue it onto the front of the matchbox.


Choose a pretty piece of paper to glue on to the back in the same way. Once it's dry, write down any notes you can think of about the memory onto the back of the box. It doesn't just have to be places and dates, be creative! Funny things your children said, what the weather was like, or a quote or poem that reminds you of the event are all wonderful things to record for future years.


Lastly, put some tissue paper and your nick knack into its box.
Make as many or as few of these matchboxes as you wish and display them on a shelf, or in a pretty box. I love to display mine in a glass bowl where they invite family and friends to discover what treasured memories are hiding within.


1. Photo Frame with old postage stamps

Time: 1 hour plus drying time
Cost: Under $20


Materials:


  • Plain frame available from Bunnings, Spotlight, Lincraft or even better - recycle one you no longer like or use. Plain frames from a store range from $4 for a small one to $10 for a larger one like I used.
  • Paint. I used leftover paint from another project but you could use a small test pot or borrow some of your kids paints!
  • Glue. PVA is good. I bought 2 bottles from Kmart for $2.
  • Clear satin varnish. I bought a small pot from Bunnings in the craft section for $5. You can buy it in a spray but it's more expensive.
  • Paint brush
  • A collection of old postage stamps. You can pick these up really cheaply on sites like ebay and trademe. I bought loads of them for $10 on ebay and have more than I could ever use. If you don't want to use stamps you could cut out squares from magazines, use old comic books, recipe books, letters, postcards, or maps. Anything bright and graphic will work.


Here we go...

Paint your frame and leave it to dry. If you're impatient like me then you can speed things up with your trusty hairdryer.


Arrange your stamps in front of you in colour groups. This will make it easier for you when you stick them on. I like mine to look random but you could be fancy and do a pattern using the different colours of your materials. Work from the top and brush on the glue to a small area at a time. Make sure all of the edges are stuck down firmly.

Once your frame is covered and it's dry grab your clear satin or gloss varnish. I need to add a warning here people, because at this stage in my own project I was in for a bit of a surprise. Varnish stinks. A lot. Keep some windows open or preferably do this bit outside. Stir your varnish according to the instructions on the pot then brush over one coat. Leave it to dry for 2 hours and then do another coat. Once it's dry you're done! One very original, very cool frame made all by yourself.

There are so many options with these frames. You could make one for a child's birthday using pictures of their favourite things, or by cutting out the letters of their name and sticking them on. You can use stamps from a particular country and then pop your travel pic in the frame to remember your trip. The possibilities are endless. Have fun!


LinkWithin

Related Posts Plugin for WordPress, Blogger...