Showing posts with label Cushions and Pillows. Show all posts

Chair Pads


Today I picked up four of these chairs from a garage sale:


We needed new chairs. Bad. When we arrived in Australia four years ago we bought the cheapest dining chair Ikea sold, which for the record was about $12 each. They lasted pretty well for a $12 chair but a few months ago the last one broke. We've been sitting on a mixture of broken chairs and a stool while we discussed what kind of chairs we wanted to purchase next. What we really want are Emeco chairs but since we're on a budget and are saving for a house it felt like a frivolous purchase. So then we debated buying second hand retro chairs, like Parker ones if we were lucky. But we already have a Chiswell dining table and a Parker sideboard in that room and we didn't want to be too retro. Finally the decision was made yesterday when I spotted four of these replica Eames chairs on a garage sale website. They were $90 for four, which is a great deal. They won't be our forever chairs, but they were the right price and they'll do until we can afford the Emeco ones we really love.

The only problem with them is that they need a chair pad. They're quite comfy on their own if you don't have a bony behind like I do. For me, I need the cushion. This afternoon I whipped up four chair pads out of some fabric I had. Here's how to make some yourself:


This is my fabric. Amazing, 1950s - 60s thick cotton that was once used as a cover for sunroom furniture. I bought a huge piece for $5 from an op shop two years ago.


I found a pot lid about the size I needed and used that as a template to cut out the circles for the chair pads. I added about 1.5cm all around for a seam allowance. I have four chairs so I cut out 8 circles for the front and back pieces.


Next I cut four pieces of cotton tape to use as a tie. I didn't want ties showing at the back of the chairs so I sewed them underneath. The wire design of the chair means I could tie it from the bottom instead of the back.


With right sides together I sewed around the edge, leaving a gap for the stuffing.

I then turned them out the right way and folded the circles in half and then in half again. I marked the point with a pen (this will be the centre of the circle). I then stitched a piece of cotton tape in the centre spot making sure to go over the stitching at least twice. I did this before stuffing because I wanted the chair pads to have some depth and an almost tufted look.


Next step was to stuff each one with hobby fill stuffing. I then pinned the open edge and sewed it stuff. 


Super easy and took only about 15 mins once they were cut out. Total cost was $10 for the hobby fill and the cotton tape. They were so easy to do I might even make more. Could I become a woman who changes her chair cushions to match the season? I easily could.


44. Hot Water Bottle Cover made from Recycled Jumper


A couple of weeks ago I flew to Wellington to celebrate my mum's 60th birthday. I arrived late at night and as the terminal doors opened I was met with an icy blast to the cheeks. Nearly 3 years in Sydney has made me soft and I was ill prepared for just how cold Wellington can be in June. When we arrived back at my sister's house I saw that she had made up a cosy bed for me. Being our mother's daughter, she had popped a hot water bottle under the covers so that the bed was extra warm. Wrapped around the hot water bottle was a nifty little cover she had fashioned out of a woollen jumper. Yes, recycled crafty goodness runs in the family! As I was packing to go home again she gave me this very cute vintage wool jumper with a Panda bear on it. She had planned to use it for another project but thought my Ben might like it. As it turns out, it was a little tight on Ben, and after these photos were taken he said "Mum can I take it off right now?"  so I knew it wasn't going to be a winner.

So this morning I decided to turn it into a hot water bottle cover just like my little sis did. Here's how to make one yourself:

You'll need:

1 hot water bottle either mini sized like mine or full size
1 vintage wool jumper
Buttons
Thread


The first thing I did was lay my hot water bottle over the jumper to get the position right. Then I drew around the shape with a pen, making sure the line was at least 2.5cm away from the edge of the bottle.


The neck was left straight because we're going to use a cuff for the neck part later on. Once it was cut out I turned it inside out (right sides together) and overlocked it all around, leaving the neck and bottom edge open. Then I stitched it on my normal sewing machine for extra strength.


The neck piece is made from one of the cuffs. I cut it off and overlocked the edge before sewing it around (again, right sides together). The bottom was closed using three buttons that were on the jumper but you could insert the hot water bottle and hand stitch the opening closed, or use ties if you like.


Mr Ben was pretty happy with it. This project took around 15 minutes to complete, perfect for a quick craft on a winters day.

42. Dirtying up the Doily


I had to laugh when my husband came to me with this design concept. You see, he's not a fan of doilies (or crochet rugs for that matter) he finds them "nanaish" . Every time I begin a sentence with Look what I made out of this doily! he gets a pained expression his face. He prefers the sleek simple designs of Mid Century furniture, bold colours, and screen printed fabrics to anything fussy and frilly. Today's project is my husband embracing the doily cushion, but on his terms. He loves traditional tattoo imagery and particularly 'Day of the Dead' skulls, you might remember them from the Mexcian inspired ikea stool he transformed. Perhaps this is his way of admitting that there will be doilies around for as long as I'm still thrift shopping... which looks like it'll be for a while. Better to embrace the doily I say, and make it work for you than to fight it.

So here is our joint effort made with thick black velvet and a vintage doily. And I have to say, I love how it came out. He's pretty good at this stuff this man of mine.

Skull Cushion made from vintage doily

Time: An afternoon
Cost: Under $20

I had a long rectangular vintage doily in my stash downstairs that I would have paid $1 or $2 for in an op shop, and I bought half a metre of velvet for $12.50. I would have preferred to use vintage velvet which I think is far superior in quality, but I couldn't source any in time. Mr J printed a skull shape off the computer and laid the doily over the top before carefully cutting out the shape. Since he doesn't sew, he made it rather, erm, detailed. I don't think he quite understood that I would have to hand stitch around each and every piece of his design. Ahem.

Once he was finished he handed it over to me and I placed it onto my 40cm square of black velvet using quilting basting spray to help hold it in place while I stitched. Then it was just a matter of carefully stitching around the skull outline, jaw, eyes, and nose. I added some sparkly buttons for eyes.


To sew the cushion I placed the right sides of the two 40cm squares together and stitched around the outside leaving a gap at the bottom to turn it and insert the cushion inner. I bought a zipper but decided at the last moment to just hand stitch the opening closed.


It took a while to make but we're both really happy with how it turned out. It's always fun to see something that you created in your imagination come to life.


Happy crafting everyone!

New store items

Aussie Damper Bread of the Bush cushion cover made from pure linen
vintage tea towel.
AUD $25.00  (SOLD)

Reverse side - Aussie Bushman

Perth cushion cover made from vintage tea towel linen/cotton blend.
AUD $25.00 (SOLD)

Reverse side

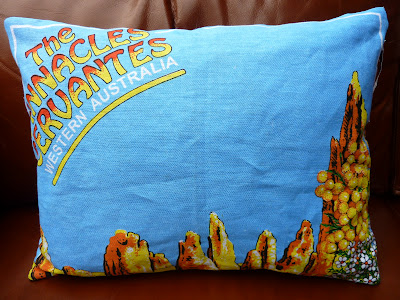
Thick cotton 'The Pinnacles WA' cushion cover made from vintage tea towel.
AUD $25.00 

Reverse side
To purchase please see the born again creations store on Facebook. Non Facebook members can email me on mybornagaincreations@gmail.com.  International shipping and Paypal are available.

40. Cushion cover using upcycled materials


This project is designed to show you how you can use odd bits and pieces from around the house to make a great cushion cover with lots of texture.

For a bit of fun I branched out and made a video for you showing how to make it. Hope you enjoy it and that it inspires you to have a go at something like this yourself.


Sewing notes:

The front fabric is a piece of teal hessian that I found at an op shop for $2. The backing piece is a remnant that I bought for just over $4. The details on the front are made from a pair of worn out leather boots and some coins that we collected from our travels. Each piece was a 40cm x 40 cm square and I used a 25cm zipper.


Lately....

One of the things I find the most fun when it comes to sewing, is reusing vintage fabrics and turning them into something entirely different. A few weeks ago I came across a kids sheet set with a Superman print from 1979. I snapped it up and have been thinking of how I could rework it into something fun for my son Ben.

A few years ago I made and sold kids jeans reworked from an adult size pair of vintage jeans and I decided to use that concept again here. Vintage denim is soft and worn in, and it's normally much better quality than the denim you can buy off the roll.

So here they are, Ben's KAPOW! jeans.


And since I've recently opened a store through my Facebook page I'm adding these little babies to the shop. 

They are:
Custom made KAPOW! jeans in sizes 12 months - 5 years made from vintage Superman fabric and recycled denim. To order please email me on mybornagaincreations@gmail.com or see the 


And while I was sewing I made a few more of my cushion covers using vintage tea towels. Most of these have a side zipper so the cushion can be used on both sides. More items are added to the store every few days so make sure you 'like' the page and check back.


South Otago New Zealand cushion made from vintage tea towel.


Floral cushion made from 100% cotton vintage tea towel.


Australian Crocs cushion made from 100% linen vintage tea towel.
(Sold)

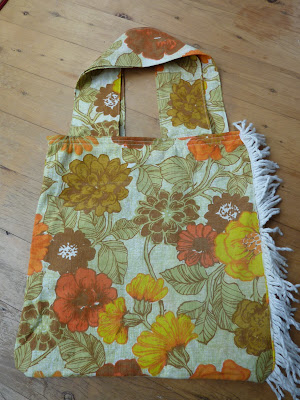
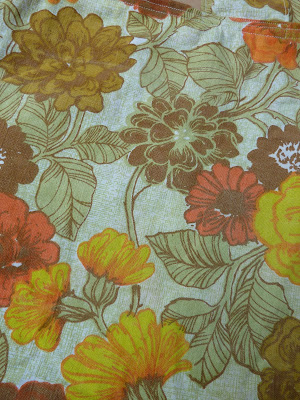
And lastly, this great Tote Bag made from 1960s floral fabric and lined with a orange and cream geometric print:


To order please see the born again creations store.

A little bit of vintage...

I was in the mood for some vintage linen today and as a result here are the latest cushion covers for sale!

I've been collecting vintage tea towels for about a year now for my Vintage Picnic Blankets. In fact, I can't go past a cheesy vintage tea towel without snapping it up. These ones are some of my favourites - pure Irish linen in fantastic bold bright colours. Most of them have a side zipper so you can turn the pillow over and use  both sides. They take a small rectangle shaped insert, but you can use hobby fill or a small square shape insert too. As you know, I'm always out treasure hunting so make sure you 'like' the born again creations Facebook page and check the store album regularly for more designs.

(Sold)

(Sold)

(Sold)


To purchase please visit the Facebook album: born again creations store.

37. Round Box Cushion made from Vintage Scraps

Today I set myself a challenge. I wanted to make something out of what I had lying around.. no quick trip to the craft store to pick up supplies, no thrift stores, just using what I had at hand. This is partly out of frugalness and partly because I have two unwell children at home today and I'm not brave (or mean) enough to take them out to the shops.

A couple of weeks ago I found an old New Zealand souvenir table cloth at a thrift store that was in pretty poor condition. I bought it for cutting because it has some lovely bright prints as long as you avoid the hole and the stains.
That round design in the middle lends itself to a round cushion don't you think? So that's what I made. A round box cushion made entirely from vintage scraps.
For the back of the cushion I used this vintage pillow case that I found at a thrift store. I bought it for the pattern and when I opened it up I saw this YSL logo embroidered on. Real YSL fabric, or someone decided to jazz up their pillow case with a fake logo? You tell me.


First step is to draw out two circles onto your fabrics for the front and back of your cushion. Measure the diameter of how big you want it to be then add a couple of inches/4cm for seam allowances. My favourite method is drawing around a big pot lid or bowl but a compass works too.
Then you'll need a strip of fabric for the outer edge. Measure the circumference of your circle by wrapping a tape measure around it then add 1 inch/ 2cm. Work out how deep you want the cushion to be and that will the width of the strip. Add 2cm for seam allowances.

Sew your strip to the outer edge of your fabric (front) with right sides together. I like to do this without pins because it allows me the guide the fabric and manipulate it a bit around the curve. Leave the ends of the strip unsewen as see at the top of the picture below.

This is what it looks like underneath:

Repeat the same process with the backing. Place it face down and pin it (if you want to use pins) to the right side of the strip of fabric. Sew around the edge and leave ends unsewn.
Turn it out the right way through the opening.
Stuff it with your choice of stuffing or insert a round cushion inner. I didn't use a zip because I didn't have one in the right colour at home (and I wasn't allowed to go shopping for this project!). But if you wanted to add one you can insert a zip in your strip of fabric by cutting a section of it in two lengthwise then sewing it in before attaching the strip to the rounds.
Lastly, hand sew up the opening shut.


I debated with myself about adding a button to this cushion so that it's tufted like the Tablecloth Pouffe I made last year. In the end I've left it so that the image isn't distorted on the front.. but I might change my mind later!

LinkWithin

Related Posts Plugin for WordPress, Blogger...