16. Decoupage Cake Tin


Time:  Under 1 hour
Cost: Under $5

This tutorial will show you how to make an old cake tin a bit fancy. It uses all recycled materials and costs almost nothing. Let's get started!

Materials:

1 metal cake or biscuit tin
1 old magazine or newspaper
Glue
Clear varnish

Here we go...


1. Give your tin a good clean and make sure it's nice and dry before you start


2. I found this great "Free Lance New Zealand" magazine from 1937 at the Marrickville Markets on Mothers Day. There are so many fantastic advertisements and photographs in it, I was almost too scared to cut into it for this project. I knew though, that if I didn't use it for something it would sit somewhere where it was kept safe, and not really loved or enjoyed.


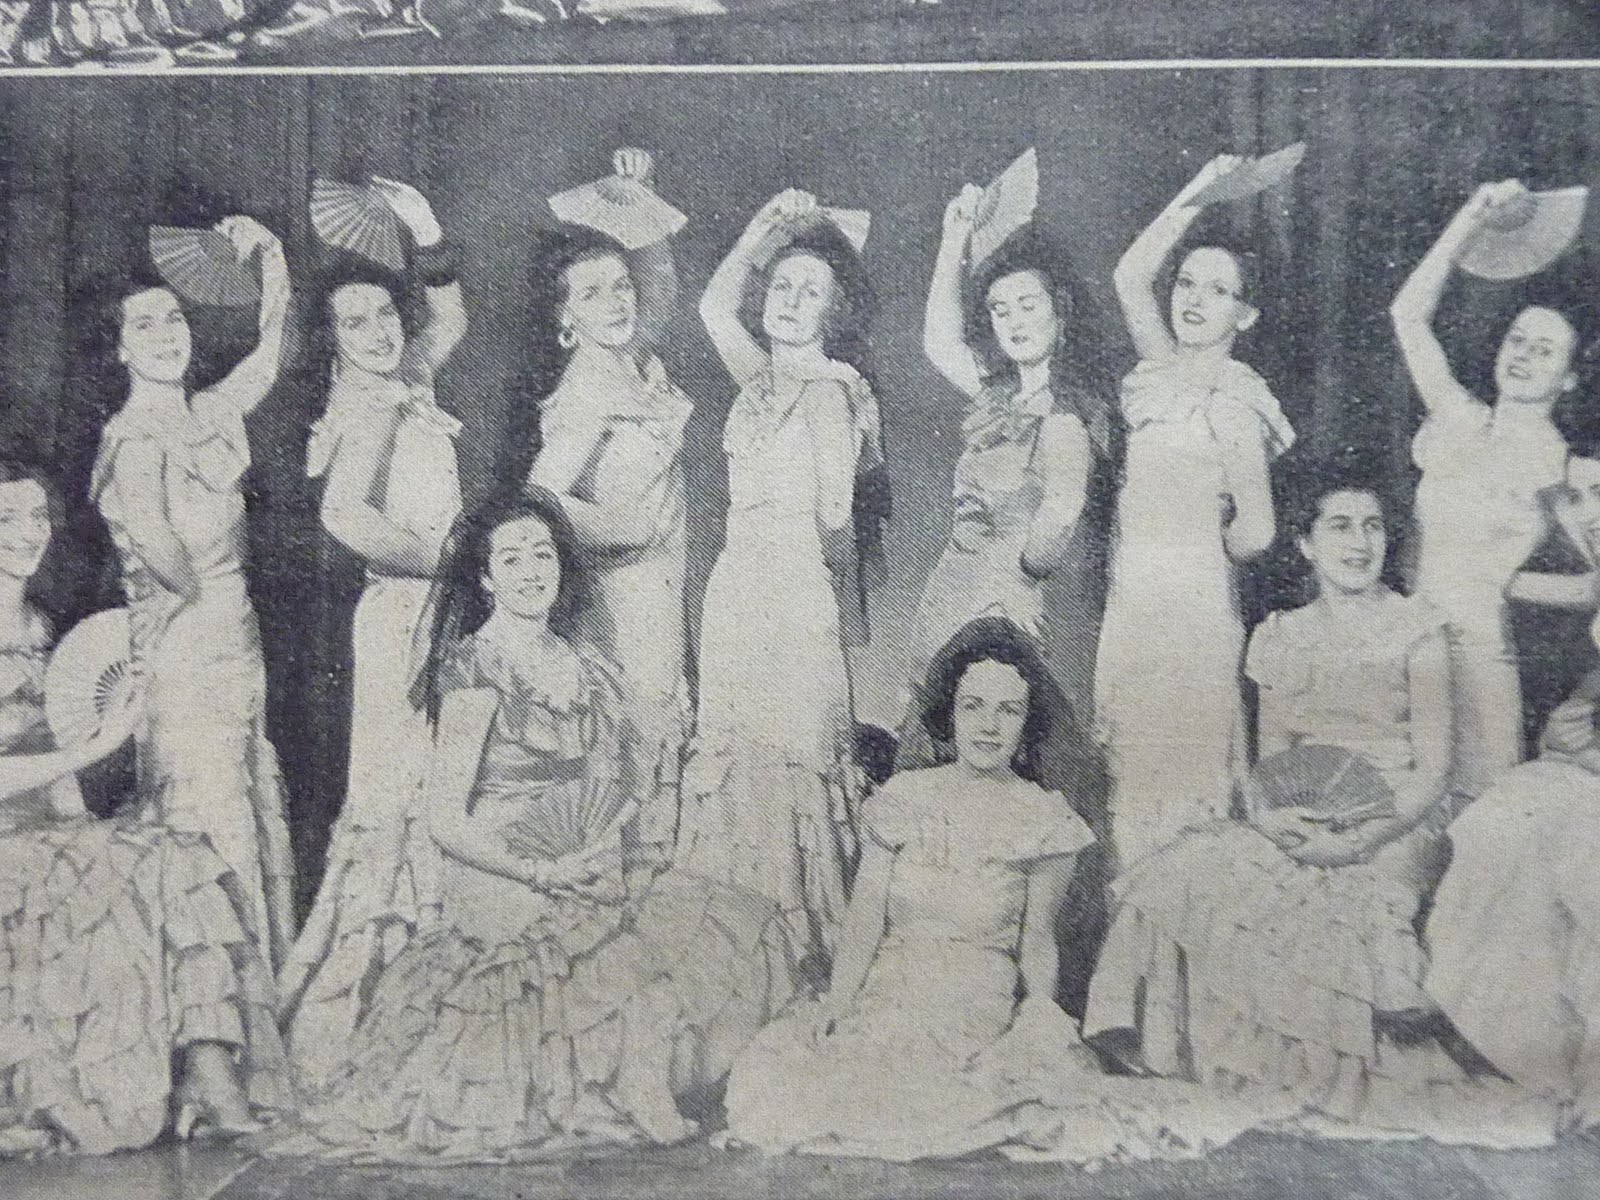
Cut out your images carefully. Try and get some different shapes - some squares, some ovals, and include some text if you like the look of it.

3. Have a play with placing your images on the lid of the tin and when you're happy, take a digital photo so you can refer back to it when it's time to glue everything down.

4. Glue your images down carefully starting with the background first. If your paper is old be extra careful when gluing so that you don't rip anything.


5. I used a roller to smooth out any bubbles, but if the odd one or two pops up don't worry about it! It's meant to look old and home made so if you have creases just smooth them out as best you can and carry on.

6. Wait for everything to dry completely or use a hair dryer to speed things up.

7. Give your lid 2 or 3 coats of varnish (over the images but varnishing the metal border isn't necessary).  There might be dark patches or it may look like the text from the underside is coming through but this is OK, when it dries it'll lighten up again.

8. Once it's dry you can lightly sand it using very fine sandpaper and reapply another coat if you wish.

Now what's a lovely cake tin without something yummy to put in it? 

What better way to honour the lovely ladies from 1930s New Zealand on the top of my tin than by using a recipe from the iconic NZ Edmonds Cookbook. 


This is the Edmonds Cookery Book Chocolate Coconut Brownie recipe that I've modified so that it's vegan and gluten free (so my son can enjoy it too!).

125g Dairy Free Margarine (sub butter for traditional recipe)
1 C Sugar
1/4 C Cocoa Powder
2 tsp "No Egg" plus 4 Tbsp water (sub 2 eggs)
1 tsp Vanilla essence
1/2 C Coconut
1/2 C Self raising GF flour (sub plain flour)
1 tsp Baking Powder

Melt margarine in a saucepan and add cocoa. Remove from the heat and add sugar then No Egg and water. Whisk it in so that there are no lumps. Add vanilla and coconut. Add flour and baking powder. Stir it all up and pour into a 20cm x 20cm slice tin that has been greased and lined.

Bake in 180 degree oven for 30 - 35 mins. Dust with icing sugar or coconut.

Enjoy!

Vegan Week - Day Seven THE END

Ding dong the soy cheese is dead. Well, gone at least. Tonight is officially the final night of Vegan Week. We've done it and we survived.

Menu:

Breakfast:
Rice porridge with soy milk and toast

Lunch:
Sandwiches, fruit, corn thins, cauliflower soup

Dinner:
Tomato and cheese sauce (soy milk, soy cheese, GF flour, margarine) pasta bake with zucchini.  I do have a wee picture of this to put here but blogger has thrown a tanty and won't let me upload it. Rude.

Hindsight....

Overall it was a good week. I've learned though that I'm definitely not a person who can do vegan full time. I reckon I must have a very speedy metabolism given the number of tiny women in my family and my inability to put on weight no matter what I eat.  This week I'd eat a full dinner and be dreaming of takeaways an hour afterwards. I seemed to be constantly hungry, which was frustrating, because I thought I was balancing my meals properly with the right amount of protein and carbs.

To be a good vegetarian or vegan would require me to eat a big balanced breakfast every day and a lunch with protein in it. I'm not good at either of those things and I think that's where my downfall has been. In my busy chasing after kids, running to and from school, fitting 100 things into one day kind of life I tend to forget food until it's dinner time and then I eat like a horse to make up for it. This works for me when I have a big plate of meat but with a bowl of soup or a meal of vegetables it most certainly does not.

What did we learn?

We found out that we all enjoy tofu. Yes, even the kids really liked it. I'll be researching ways to prepare tofu and it'll be a permanent fixture on the dinner plan from now on.

We discovered that while we do like meat at night, we don't need it every night. Not by a long shot. After this week we'll be reducing our red meat to once a week and increasing our meat free nights from 1 to 3.

We realised that most of our worries about the kids not eating vegetarian meals was in our heads. Not once in this entire week did either child ask where the meat was. They ate everything they were given without exception and that goes to show that we can be a bit more adventurous from now on!

Overall it was a great experience and something I'd recommend to any meat eaters out there.
Now where's that burger.....

Vegan Week - Day Six "Feed Me!!"


Menu:

Breakfast:
Toast and tea

Lunch:
Sandwiches and fruit

Dinner:
Cauliflower soup with home made bread

I'm STARVING! Nothing is filling me up and I'm hungry all the time.  Even after a meal of quite substantial root vegetables or chickpeas I'm hungry an hour later.  Miss J and I were fantasising about what we'd order from McDonalds tonight. My mouth is watering at the thought. And I don't even like McDonalds!

One more day to go, and at this rate it'll be a long one.

Glenbrook Markets featuring Sami Bop

On the 3rd Saturday of each month the quiet village of Glenbrook in the lower Blue Mountains transforms into a bustling gathering of shoppers and browsers alike. The local public primary school is taken over with stalls and coffee carts for the day and on a bright sunny day like yesterday, the atmosphere is fantastic.


There are organic fruit and vegetable stalls, antiques, plants, cupcakes and artisan bread, home made crafts, and hand made preserves. My favourite fruit and vegetable stall is here each month and I always make a point to go and check out the new produce they have on offer.


One point of difference with Glenbrook Markets is the number of stalls selling quality hand made children's wear. My favourite of the day is Sami Bop, featuring the work of Blue Mountains local Danette Rowse.


Danette has been creating clothing from recycled vintage fabrics for the last 20 years and each garment is individually hand made. The fabrics she uses are mostly vintage and are either hunted down by Danette or gifted to her by her many fans.  Clothing is available in sizes 00 - 8.  I loved Sami Bop's cowboy pants with fringing down the side seams, girls dresses in bright retro fabrics, and the assortment of hats in great prints.


You can find Sami Bop at the following locations:

- 'The Nook' Arts & Crafts Gallery - Upstairs 133a The Mall, Leura. Open 7 days.
- 1st Saturday of the month - Cobbitty Village Market, Cobbitty Public School.
- 3rd Saturday of the month - Glenbrook Market, Glenbrook Infant School.
- 3rd Sunday of the month - Magpie Market, Lawson Public School

Or you can shop online at her Etsy Store which is available here: sami bop etsy shop.  You can also visit her on Facebook here: sami bop facebook page.  

Thanks Danette for showing me your work!

*********************************************************************************
Glenbrook Markets are open on the 3rd Saturday of each month at the Glenbrook Public School Infants Site on Ross Street, Glenbrook. Glenbrook is on a direct rail line to Sydney Central Station and the train station is an easy 5 - 10 minute walk to the village. The markets are in the centre of Glenbrook and there are numerous cafes and a playground with public toilets adjacent. There are two ATM's in Glenbrook - an ANZ at the petrol station and one in the small supermarket in the shops.


Vegan Week - Day Five

Whoop! Almost there.  We had a good day today. I think it's definitely getting easier.

Menu:

Breakfast:
Baked beans and toast

Lunch:
Toasted sandwiches, fruit, salad

Dinner:
Leftover tofu stew made into shepherds pie, roast organic pumpkin and brussell sprouts, broccoli

Dessert:
Vegan and gluten free chocolate self saucing pudding


I went down to the markets this morning and bought some lovely organic produce. It makes it so much easier to eat vegetables when you're excited about the produce. Dinner was nice, the kids ate everything without any bribery at all ha ha.  The tofu was good as a leftover and I think this dish is definitely doable as a once a weeker. The $2.30 pack of tofu has made enough stew for 2 dinners and 2 lunches, pretty good on the bank account.

Two days to go.. two days until my big fat juicy cheesy meaty burger. Yummo.

15. Remaking Vintage Clothing


Today I'm going to show you how to transform old and outdated second hand clothing into a really cool contemporary dress.  It's simple to do and lots of fun.

I bought this 80s tragedy from a charity shop up the road for $4. When you're looking to remake vintage clothing you need to look past the ugly and try and focus on the fabrics and the shapes.  This dress has the perfect cut for remodelling because it's got an elasticated waist and a belt.

Don't be concerned too much about the size of the garment either. This dress is a size 16 and I'm a 6 - 8 but it still worked!

Before buying spend some time making sure the garment is free of stains and rips in the fabric.


The next thing you'll need is a t shirt, long sleeve shirt, or tank/singlet top. I bought this one for $3 from a charity shop. For this piece you'll need to make sure it fits you well and that the fabric is in good condition.

Grab your clothing and get out the following items ready for sewing!

Pins
Scissors
Sewing machine and thread
Needle and thread

Now you're ready to make your dress. Follow these step by step instructions and you'll have a new dress in no time at all.


(1) Try on the top and mark just under your bust with a pin
(2) Lay the top down and cut along where you've placed your pin as shown:


(3) Cut the skirt from the dress, or if you're using a skirt for this part you can ignore this step.


(4) Turn your top inside out and pin it to your skirt (right sides together) being careful to match side seams.  If your skirt is too big for the top you can make little pleats by folding the fabric and pinning it.

(5) Sew around the join neatly.


(6) Turn your top out the right way and make sure everything is sitting nicely.

(7) I decided to take the sleeves off my top. The easiest way is to cut one side then use the discarded sleeve as a pattern on the other sleeve. This will make sure that both cuts are the same. Fold under a small hem on the new sleeve and sew.


(8) My dress came with a belt which I reused. A tie or a sash looks really great if you don't have a belt, cinching in the waist pulls the dress together.

(9) That's it - a new dress recycling an old vintage number in less than an hour.


The wonderful thing about remaking vintage clothing is that you can use all sorts of pieces in new ways.  I was left with a piece of elastic from my skirt so I decided to remake it into a rose pin.


Have a great weekend everyone and happy sewing!

Vegan Week - Day Four

Over half way there!

Menu:

Breakfast:
You guessed it.

Lunch:
Vietnamese noodles and spring rolls with vegetables and egg and seafood

Dinner:
Falafel, rice, salad, and hummus


J and I had a date day today. Both kids were at school/preschool and J had the day off work so off we took giggling like two teenagers wagging school.  We decided to go to Cabramatta for a look in the shops and a Vietnamese lunch. There are admittedly many vegan Vietnamese options available but this was a once in a blue moon opportunity to eat a meal without having to cut up someone else's meat. I have to fess up and say that I did order some animal products with my noodles. And it was good.

Post Dinner Verdict

Yummy. And even more so because I didn't have to cook it. We found these great GF falafels at Coles called "Yumi's" and they just need a quick microwave before they're ready.  I make my own hummus using tahini, lemon juice, oil, garlic, and a tin of drained chickpeas.  Both kids ate their dinners happily. What good kids I have!

14. Pacific Print T-Shirts


I love original kids clothing, but often the coolest stuff is the most expensive. When I had my daughter I quickly realised how much PINK was about when it came to girls clothing. My girl was not a pink girl, and as a bit of a tomboy myself I decided the best thing to do was to dust off the sewing machine and make some clothes for her. 

Plain kids t-shirts cost almost nothing and in under 10 minutes you can transform one into a very cool little number.  Here's how to do it.

Cost: Under $5
Time: Under 10 minutes

Materials:

1 plain cotton kids tshirt. Mine was $2 from a department store.
Fabric remnants - for mine I used Pacific cotton prints that I'd collected over time. Quilting fabrics work just as well.
Fusible hemming tape or spray glue.
Thread and scissors.

Here we go...


If you're planning on making a few of these I suggest cutting a square out of stiff cardboard so that you can use it as a pattern to draw around.

  1. Cut out a square of printed fabric to fit in the centre of your tshirt.
  2. If using hemming tape cut 4 strips and use them to fuse the print onto the tshirt with an iron, making sure that you place it in the centre of the shirt.
  3. If you're using spray glue (my fav method) spray the wrong side of your printed square - outside - and place it onto your shirt in the centre.
  4. Stitch around the square neatly.
You're done!

The edges of the print will fray in the wash but the glue or tape keep it from fraying too badly. It looks great with a bit of fray anyway, and my tshirts have been through my 2 kids and then various cousins and nephews without wearing out.


How about trying:

Sewing a vintage doily onto the front instead of a square of fabric
Cutting out the print off an old fav tshirt and using that on a kids shirt
Using a square of vintage fabric from a curtain or tea towel

Too easy.

13. Origami Wallet


Cost: Under $10
Time: 1 hour tops

My lovely husband bought me a pressie the other day. It was the crafty book Sew La Tea Do by Melbourne author Pip Lincolne. I spotted this book at Borders a few months ago and mentally put it on my wishlist. There are 24 beautiful sewing projects in this book and it comes with an envelope full of patterns to help get you started.

Today I found myself with a quiet empty house and thought I'd get out my ragbag to see what was inside. I found some blue and white gingham and the remnants of the tablecloth I used in my Retro Library Bag post so I decided to have a go at Pip's sweet Origami Wallet.

Materials:
1 fat quarter of cotton fabric cut to 46cm x 50cm (18 inches x 20 inches).
1 x 22cm x 22cm (8 3/4 inch x 8 3/4 inch) square of heavy-weight fusible interfacing
10 cm (4 inches) hat elastic
1 large button

Here we go:
Fold your fabric wrong sides together lengthwise and press firmly with an iron.

Open it out again and place your square of interfacing shiny side down on the bottom left corner of the wrong side of your fabric as below:


Iron the interfacing onto the fabric using a medium - hot iron (no steam), press down firmly.

Next with wrong side facing up fold in 1cm (3/8 inch) along all edges and press firmly with an iron.

Fold the rectangle right sides together, matching all edges. Pin into place and press. Sew around all edges of the rectangle and press again. Well done!

Lay your rectangle out, interfacing at the top. Fold up the bottom edge 12cm (4 3/4 inches) and press.
Now get the new bottom edge, fold it up so that it sits 1cm higher than your original edge. Now bring this fold back down so that it sits in line with the bottom of your rectangle. Confused? Have a look at the picture below:


The idea is to create a 'concertina' pocket for the cards in your wallet. If you're confused try it out with some paper until you get the hang of it. Make sure you press everything firmly so you can see where to fold each section.

Unfold your card pocket and stitch along the bottom pocket edge (the dashed line above) so that it sits nicely. Refold your pockets and pin into place.

Now grab your other interfaced edge and fold in 8cm (3 inches) and press. Sew a seam along this edge to secure it. 

Now fold your wallet in half, matching up all of the edges. Exciting!

Next up open the wallet and measure half way across your card compartment. Grab your elastic, fold it in half, and insert the two ends into the bottom fold. Have a play to make sure the elastic is a good length and trim if necessary. Sew along this bottom edge securing the elastic as you sew.

Fold your wallet back in half, stretch the elastic around the front, and mark where your button should go, Stitch it into place.

Almost there! Stitch up the sides to hold everything in place. Place a card in the card compartment, mark the size, then sew up a seam up the middle of the card pockets.

You're done!!

How about...

Stitching some vintage fabric onto the front of your wallet
Gluing a doily or piece of embroidery on the front
Sewing some vintage buttons all over the fabric
Making a patchwork wallet


Vegan Week - Day Three

Ok. I need the meat. I must be doing something wrong because after dinner each night I'm ravenous. I'm eating a sandwich (or 2) and I'm still hungry. I'm experiencing a desire for steak as intense as my pregnancy cravings for Burger Rings and Fillet o Fish. Watching Masterchef each night is just about killing me.

And now, dear readers, my confession. Last night my husband brought home some Tim Tams. Tim Tams!! I ask you, who can resist a Tim Tam? That's right - no one. So yes, I ate two, and yes, they have dairy in them. I cheated. And were they worth it? Too bloody right they were.

Anyway, onwards and upwards!

Menu:

Breakfast:
Rice porridge (again!)

Lunch:
Baked beans on toast

Dinner:
Pizzas with soy cheese, mushrooms, olives, sun dried tomatoes

Post Dinner Verdict


Blah.  The pizzas were Ok.  I didn't notice the soy cheese and the kids asked for seconds. I'd call that a success. It just wasn't yummy.

I struggled today.  I feel quite flat and tired even though I'm sleeping well. Too little protein? Not enough iron?

I'm a bit disappointed. I really thought I'd be feeling great this week, not worse. And why is it that the only thing I can think of is:

Vegan Week - Day Two "TOFU ALERT"

Menu:

Breakfast:
Same as yesterday, brown rice porridge followed by peanut butter toast

Lunch:
Home made hummus (yes, NZ spelling, but I'm sticking to my guns on this one) sandwiches, corn chips, fruit

Dinner:
Unbeef stew made with tofu, swede, carrot, and potato with a side of organic green beans

Dessert;
Vegan, gluten free pear and ginger cake


I had soy milk in my tea this morning. I've long known that I can't tolerate dairy and I've admitted defeat when it comes to many of my favourite dishes. I didn't even have creme brulee when I was in Paris. And I love creme brulee.  I won't eat cheesy pasta dishes, I shy away from ice cream, and have gotten used to soy milk in my hot chocolates. But tea, tea is where I draw the line in the paddock if you will.  So it was with a sigh of resignation that I reached for the carton of soy milk this morning. After my first taste I have to say I was surprised ... not bad. Not bad at all.

Post Dinner Verdict
I have to say, I'm in a state of shock. Not only did the kids eat their tofu, they didn't even protest. J asked me what it was and I mumbled something about "Erm...cheesy, meaty, stuff" while avoiding eye contact. B went straight in, pronounced it "Yum" and ate everything on his plate.


The stew was actually really nice. If you'd like the recipe it's available from vegweb.com here.  I'd definitely do this one maybe once every week or two. It's economical too - the tofu was $2.30 and you could use just about any root vegetables you have in your veggie bin.

Roll on Day 3!!

Vegan Week - Day One

Menu:

Breakfast:
Brown rice porridge with soy milk, LSA (ground linseed, almond, sunflower seeds), and raw organic sugar

Lunch:
Depending on the family member - salad, sandwiches, corn thins

Dinner:
Vegetarian nachos (kidney beans, refried beans, organic corn, seasoning) with salsa and guacamole.


Shopping this morning was interesting. My supermarket has moved everything around so it was fun trying to find all of the vegan ingredients - not. I bought everything on my list except for vegetarian bacon for pizza night. Unfortunately every single vegetarian "meat" product is laden with gluten so that ruled that option out for us. I think the fact that gluten appears in most vegan meat substitutes is enough of a reason for us not to eat a vegan diet long term. There's only so much cooking creativity I can muster without any dairy, gluten, or meat on the menu!

I was a bit annoyed to see that I spent $40 over my shopping budget for the week. I thought that without any meat in the trolley I'd be saving a bit. I think all of the soy and rice milk and the other organic things I bought today tipped it over the edge. We had our $50 organic fruit and vegetable box delivered at midday so that makes this week's vegan shop come to a grand total of $190.  We'll be eating well though and considering all of the specialty ingredients I reckon that's not too bad.

The Verdict? Breakfast and lunch were easy, the kids eat rice porridge every day anyway. Dinner? Yummy but SALTY. I bought a packet seasoning mix for this and normally I make my own. The kids ate it all up and didn't even ask where the mince was. Day one was easy peasy. Tomorrow night - tofu. That's going to be a bit more of a challenge!

Vegan Challenge!!

Yes, I am crazy to do this vegan challenge when we're already gluten free and J can't eat some varieties of fruit. I'm thinking of this as the restricted diet Olympics. And I told you, I love a challenge!

So I've been working out my meal plan and shopping list today in preparation for shopping day tomorrow. I'm so curious about soy cheese and pretend bacon that I've included a pizza night just to give them a whirl. On Saturday night I tried out some chickpea and pumpkin patties on the kids and they loved them, so that was very encouraging.

Tomorrow is the official beginning of vegan week - wish us luck!

Recycled Cardboard Drum Lampshades

When I was in checking out Reverse Garbage in Marrickville over the weekend I spotted some cardboard drums. I just knew there was a great "upcycling" project waiting for these drums so I've been jotting down ideas and doing some googling trying to figure out what I could make with them.

Yesterday I found these absolutely divine lampshades made by Shiner International.  According to owner Joe Manus, Shiner's goal is "to transform tons of landfill-destined materials into killer design. By building heirloom pieces out of disposable elements, we refine the future by upcycling the past." 
I like it!


I love these. I love the natural colours, the eco-friendliness of them, and just how clever these designers are. What do you think?


So after ogling the cool lampshades and furniture made by Shiner I was all excited to try something out for myself.  My husband has put a bit of a pin in my bubble though because he reckons it's going to be pretty difficult to make the cuts in the drums. It's lucky I have him around actually, because I tend to get carried away with ideas and not think about technicalities. Oh well.


I'm still keen to try it out though. I'm on the lookout for an old shade the same size and shape as the ones at Reverse Garbage so I can recycle the inner frame  and use it in my cardboard drum.
As for the cutting part, I'm thinking about taking one down to Bunnings to see if the guy in the wood section will make the cuts for a few dollars. 


I might even sweeten the deal by taking along a chocolate muffin. You should never underestimate the power of baked goods on tradies. 


I'll post again when I've had a go at this lampshade for myself so watch this space. Wish me luck!


12. Grandpas Vest Cushion


I found this funny woollen vest at some markets a week ago in a $5 bin and I knew instantly that it was perfect for a project I've had up my sleeve for some time now.  I love the geometric design and the buttons up the front. I also have a new appreciation for multi coloured knits now that I've had a go at knitting myself!  I originally saw something similar to this cushion in a book I have called Flea Market Style. It's something I've wanted to try ever since I bought the book so when I saw this vest, I knew I had to try it.

Cost: Under $10
Time: Under 30 minutes

Materials:


One 100% wool vintage vest, look for one that has a square boxy shape - pre-wash in warm wool wash and lie flat to dry
One vintage pillow case - pre-wash (goes without saying!!)
Cushion/Pillow insert or stuffing
Cotton, thread, pins

Here we go...


I found this retro pillow case at a charity shop for $1.

The first thing to do is lay your vest on top of your pillow case and mark out where the bottom of your vest comes to with a pin.  Trim the excess length off your pillow case, making sure you cut the open end, not the sewn end.


Turn the pillow case inside out and sew along the cut edge leaving a gap so you can turn it the right side out.

Normally I would insert a cushion inner but in the interests of recycling I used some stuffing I had left over from another project.

Once you have your cushion nice and full and the stuffing pushed into the corners you can sew up the gap.

If you want to be able to remove the inner you could put a zip here or some ribbons or buttons to tie it.

Now it's time to grab your woollen vest and put it over the cushion.  Take some time to position it properly then sew up the bottom edges of the vest and stitch (by hand) around the arm holes to keep it all in place.


For a bit of fun you could use a business shirt for your inner cushion and leave the collar, or add a neck or bow tie afterwards.  I hope you enjoyed this tutorial, happy crafting!

LinkWithin

Related Posts Plugin for WordPress, Blogger...