Showing posts with label Home decor. Show all posts

How to build a robot out of recycled materials

This morning we woke up to rain and mist and no real plans for the day. Since we're not spending any money at the moment due to our No Shopping Challenge we decided today was a perfect day to hang out at home and get creative.

Ben was given this great book by his Auntie for Christmas. It has cool ideas for making robots using odds and ends that you have lying around at home.


We didn't end up doing a project from the book but it did give us inspiration to do this:


We had an old laptop with a broken screen stored away in a cupboard and it was the perfect thing for Mr J and Benny to dismantle. Ben loved using the screw driver and taking the pieces out by himself. Pretty soon we had a big crate of wire, circuit boards, and pieces of metal.

Next came construction:


Then spray paint using some leftover car paint we had in the laundry.. and gluing the cool pieces from the lap top in place.


 This is a great up cycling/recycling project to do with your kids. Everything on "Otto Ankle" (that's what Ben named him!) was found around the house. If you'd like to make something like this yourself here are some ideas of what you may need:

  • Old electrical equipment such as a stereo or computer. Make sure the battery is removed if you're taking apart a laptop and be sure to supervise your kiddies just in case as there are some sharp metal bits inside.
  • Cut off cords from broken appliances
  • Tin cans
  • Plastic bottles and lids
  • Duct tape
  • Insulation tape
  • Super glue
  • Cardboard tubes
  • Sharpie pens
  • Spray paint or regular acrylic paint
  • Wire
  • Cardboard boxes in various sizes
We've started a collection of things of this nature for Ben to make stuff with, that way when we find something interesting it's easy to add it to the box. We're going to keep the box up high so he has to ask to use it (otherwise I foresee some 2am building sessions). Council clean up days are a great way to build up a stash of interesting building materials or ask around your friends to see if anyone has any electrical equipment they want to get rid of.

Happy building!

Olive Oil and Beeswax Wood Polish


Every now and again a roadside or op shop find needs a bit of TLC. A couple of weekends ago we drove past a gorgeous 1975 Parker Cabinet that had been put out for the council clean up collection. Of course, we went back (and spent the rest of the day getting it home in pieces in our little car!). It was in great condition except that the wood was dehydrated and had turned a pale sand colour, so different from the rich teak colour that's typical of Parker furniture.

After a bit of research I made up my own wood polish and set to work on the cabinet. The recipe couldn't be easier - two ingredients! And this polish works. Your wood will be glossy and nourished and your hands will receive a nice moisturising treatment in the process.


Today I decided to tackle a 1970s Chiswell table that we bought for $30 a couple of years ago on eBay. We always meant to strip it back and repolish it but it never happened. In addition to it's 40+ years of grime we've added pen, glue, food, and paint to the table top since we've owned it thanks to the kids. It was time for a clean.

The first thing I did was clean the top using warm soapy water and steel wool, following the direction of the grain. Then I gave it a couple of rinses and two spray/wipes with my home made cleaner. After it had dried completely I grabbed a scrap of flannel fabric and began working the polish into the wood. As you can see, the wood was very dry and looking at bit worse for wear.


Once you have applied the polish you can leave it to soak in for a while or buff it straight off using a clean soft cloth.

You can see the difference the polish makes straight away:


And here's the finished table top - I think I'll do another couple of coats in the next couple of weeks just to make sure the wood is really protected.

BEFORE:


AFTER:


And here is the freebie Parker that we found, all polished up using the same polish:


If you'd like to make your own wood polish the recipe is super simple.

Get a small glass jar and fill it with some olive oil. Place it in a pot that has water simmering in it, you want the water to come up the side of the jar about 1/3 - 1/2 - not too far because you definitely don't want any water coming in the top. Add some beeswax (I used a piece of an old candle) the ratio is about 4 parts oil to 1 part wax. Melt the beeswax into the oil until it's completely dissolved. Take it out of the water carefully and allow it to cool down. It will set to a thick paste.

Have fun polishing :)

43. Salvaged Wood Art Display


If you have children, you have a lot of drawings and paintings. Kindy mums I know you understand what I'm talking about. I love the artwork my kids create but sometimes wondering what to do with it all can be a little overwhelming. We already have a pin board and the fridge covered and it feels a little heartless to throw such precious work away. So what's a parent to do?


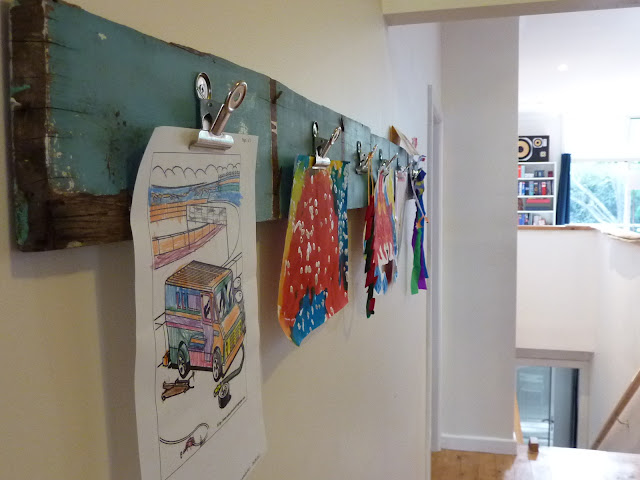
A few weeks ago Mr J and I were on a date at a Junkyard (oh yes, you read that correctly) and we came across this great painted piece of old wood. I had an idea for a place to hang the kids art and certificates and this wood was just about perfect. We bought it for $5 and threw it in the back of the car.


The only issue with the wood was that I wanted a long thin piece and this one was short and wide. We were going to saw it in half but in the end Mr J gave it one almighty kick and it split just where I wanted it to. Nice.


We needed 6 metal 'letter clips', we recycled four of them and bought another two for $1.20 each at a stationery shop. The clips work really well because you can change what art you're hanging quickly and they don't damage the drawings.


The clips are secured to the wood using a drill and screws. We left all of the old nails and rough bits on the wood because we liked the look of it, but if you plan for this to be within reach of little hands make sure it's smooth first.


We used removable velcro mounting strips to hang the wood on the wall.


The kids loved seeing their work displayed on the wall for everyone to admire. Jemima brought home a merit certificate from school and that was promptly added to the mix. Ben will add something tonight no doubt, as he spends a couple of hours drawing each day.

So that's our Art Display made from salvaged wood. Total costs were under $10 and it took about two hours to put it all together.

Have a great Friday everyone!

41. A Braided Rug


This morning I laced together the last piece of braid in Jemima's rug. This project has been somewhat a labour of love for me. As far as crafts go, I'm not very patient and this was one project that was never going to be completed in a hurry.

I knew all along that I would eventually finish it of course. Making something for the kids provides that pull to keep on going, just do a wee bit more for the day. It's also a special project for me, because it seems to sum up what born again creations is really about. Finding something old and unwanted, changing it, remaking it, redesigning it into something beautiful and functional.

Jemima's braided rug is recrafted from three queen size vintage sheets ripped into 5cm strips. She loved ripping the sheets with me - the sound of the rrrrrip! The question in her eyes "Am I really allowed to do this?" The satisfaction of a growing pile of fabric pieces.  Once you have a few strips ready grab three and sew them all together at the top short end, one on top of the other. This is to secure the braid so that it doesn't unravel.


The next thing to do is start braiding your fabric strips. I found it easiest to secure the end to a door knob and stand up as I worked. Keep braiding, adding fabric when your strips run out. The best way to do this is to make a small nick in both the short end of the fabric and the top of the new piece you want to attach. Lay the new piece behind the short end matching the nicks. Pull the long end of your new piece through the holes and pull tight. There are lots of good youtube videos on braided rugs if you need help.


As you braid roll it into a ball to keep it all tidy. Change colours every now and again, or use two strips of one colour and one strip of a contrasting colour as I did. You'll need a large ball to make a rug, to test the size you can lay it out flat and wind the braid around to see how much more you need to do.


When you're ready to assemble the rug get the end that you sewed together right at the beginning and lay it flat on a table. Wind the braid around it making sure that it lies flat. You can stitch it together using strong upholstery thread or you can get a blunt needle and some lacing cord and weave the braids together - in through one loop of a braid, then around the loop of the braid lying next to it. I started stitching and ended up lacing it. Lacing was quicker but didn't hold the rug together as tightly. With either method don't pull too tight or it will cause the rug to curl up.


Red and White Christmas Part 1


I'll be the first to admit that I've struggled to get into the Christmas spirit this year. This will be our first year spending Christmas with just the four of us and I'm feeling the distance between our home in Australia and our families in New Zealand now more than ever.

I was emailing my sister about it and she fired back a list of things to do to get that Christmas feeling going. My sister is has an extraordinary talent for list making.

As I began to tick off some of the things on her list - sort out some food to donate to Christmas Hampers at the food bank, make a family Christmas video to share, find recipes for cookies - I started to feel a glimmer of excitement.

Despite it being a small affair, I'm determined to make the 25th a special day. As I look around our house I can see my lack of enthusiasm on the bare walls and windows. It's time to make some decorations and get this house looking festive.

In October I was at Ikea with my sister and I found some Xmas gift wrap that I really loved. I bought three rolls and I've wrapped everything in it so far. I love the classic, simple design and the contrast of the red and white. I've decided to base my decorations this year on the patterns and colours.

Here are some of our presents all wrapped up in this gorgeous paper:


Next step was to make some decorations with the kids. I decided to make some basic salt dough ornaments because they're cheap and fun to make.


The recipe is 2 C plain flour, 1 C salt, and 1 C of water. You make a dough and knead it as if you're making bread then roll it out on a floured surface until it's quite thin. Once you've cut out your shapes you'll need to press a hole through the tops of them for the ribbon. I used a chop stick. Then they go into the oven on a lined baking sheet at 100 - 120 degrees (centigrade) for 3 - 4 hours to harden.

We painted ours red and then decorated them with little felt reindeer and silver glitter glue.


Once the ornaments were ready I needed something to hang them on. Our Christmas tree is already bursting and I wanted these decorations to be something a bit different that I could use as a table centrepiece on Xmas Day. I found a branch outside and painted it white with some leftover house paint I had before securing it in floral foam inside a vase. I wrapped some red felt around the vase to hide the floral foam and popped some off white felt scraps inside.


I've been really inspired by images of Scandinavian Christmas decorating this year (too much Ikea perhaps?) and I'm hoping to come up with something clean and simple along those lines for our Christmas table this year.  Tomorrow the kids and I are making red and white fabric garlands using fabric scraps that we'll be recycling/upcycling into decorations.

So we're making a start on feeling festive. A bit late perhaps but better late than never!

33. Hand Printed Fabric Made Easy

If you're a fabric geek like me you'll appreciate that hand printed fabrics are just about as good as it gets. For my birthday this year my lovely sister in law bought me Lena Corwin's book Printing by Hand proving that a) she's cool, and b) she knows me well.
There are lots of different printing techniques in the book ranging from simple to complicated. Today I tried out a basic stamp print onto cotton unbleached calico fabric using oven bake clay and fabric paint.  The book suggests foam or lino and a lino cutter to make the stamps but after playing with clay with the kids over the school holidays I figured it would be easier.  You can even attach a blob of clay on the back of your stamp as a holder.

Materials
Fabric
Fabric paint - I bought mine from Spotlight. You need the kind that you iron to fix the colours so that they're washable.
Oven bake clay from a craft store. This is clay that you shape then bake in an oven on a low temperature for it to harden.

Here we go...

I decided on a simple sun stamp so I rolled out my clay and drew the shape I wanted with the tip of a knife. Once I had the basic shape I used a toothpick to carve in details. Anywhere that you carve out won't have paint in your final print. Once I was happy with it I carefully cut around the sun shape. If you work on some baking paper you can pop it straight into the oven without having to pick it up.


Once it's out of the oven and cool brush away any crumbs with a dry paintbrush.

I experimented with different ways to apply the paint. First I used a sponge which I had covered in paint thinking that it would apply the paint evenly if I pressed the stamp into it, but it was too light. In the end I applied the paint to the stamp generously with a soft paintbrush.


Once you have finished your printing you'll need to wait until it's dry before ironing the fabric with a dry (no steam) iron. Wipe your stamp and pop it away for another day. 

This is easy enough for kids to have a go and you can make your fabric into just about anything, or leave it whole and use it as a tablecloth or picnic blanket.

I made mine into a simple summer dress for my daughter.


32. Vintage Wool Blanket with Buttons


It may be heading towards spring in the southern hemisphere but judging from the weather over the last two days it's not too late for this lovely wool blanket. I first saw something like this in Amanda Soule's book Hand Made Home.

Time: An afternoon
Cost: Under $20

Materials:

1 Vintage 100% wool blanket from a thrift store. Mine was $3 from Vinnie's.
1 Recycled wool jumper
Vintage buttons
Embroidery thread
Darning needle
Scissors


Here we go...


I used a stained and outgrown merino top of my daughters for this project.


Cut out shapes from your woollen jumper. I used small squares but you could do flowers, circles, or stars.

Once you have a pile of little shapes select your buttons and thread.


I found this bag of embroidery thread at an op shop recently for $4. Bargain! I decided to keep my blanket quite simple so I used cream thread and white/cream buttons.

Once you have your buttons selected start sewing them on with one of your shapes in between the button and the blanket.  A random design is easiest and best.


Once you've covered your blanket you can edge it with blanket stitch as I've done with cream wool, or sew some bias binding around the outside.

The great thing about this blanket is that you can cover any stains or holes with the buttons. So if you see a lovely woollen blanket that has a mark on it don't discount it, with clever placement of some buttons you can hide any imperfections.


I'm using mine as something warm and cosy for watching tv and reading but one of these in bright colours would look great on a kids bed. You can use wool felt instead of recycling a woollen jumper if you don't have one handy that you're willing to cut up.

Happy crafting!

LinkWithin

Related Posts Plugin for WordPress, Blogger...