Showing posts with label Furniture. Show all posts
35. Step Stool
I have to share this step stool make over even though I can't honestly claim the credit for it. This is my husband's creation made from an Ikea step stool worth $14.99. It shows what you can do with something plain and cheap if you have a little time and creativity.
Here's the stool before it was painted. Actually, this is a new one. Our one had been left outside and was watermarked and looking pretty horrible.
After painting it red he found the images he wanted before printing them on our home inkjet printer. He wanted to do a Mexican theme so we have Day of the Dead skulls, roses, and of course, Frida.
I love the little circles of tin foil that he's used for the eyes of the skulls. He glued everything down and then when it was dry he gave it a couple of coats of clear varnish.
Using decoupage is one of the quickest and easiest ways to transform a plain piece of furniture and you can tailor it to whatever your taste is. It's very budget friendly too.
Happy crafting!
The Retro
I'm sitting in my new living room after everyone else in the family has gone to sleep thinking about all of the second hand goodies that we've collected in the 18 months that we've been in Australia.
To my left is a vintage teak Parker cocktail cabinet that we bought for $60 from a Vinnie's store in Wollongong. To my right is an $8 armchair that I bought off ebay. Next to that is a noguchi style coffee table that we got off the side of the road. Around the corner is a 70s Chiswell table that I found for $30. All of that sounds like an awful lot of retro doesn't it? Here's a picture of our main living room which will show you how you can incorporate a bit of vintage into your room without looking like you live in a second hand store. All of our rooms are done on a tight budget and we rarely buy anything new.
In this room we have a few vintage pieces but we've balanced them out with some new items. The sofa is new but from a discount store and was bought for a bargain price. The rug on the floor was $49 from Ikea. The black and white cushion was from Target. The paintings on the wall are from our trip to Vietnam and they're framed in Target frames which were $15 each. The Parker is on the right and we've used white ornaments to link to the rug and our newest addition, a 1950s china cabinet.
Here is our $30 1970s Chiswell table with some $14.95 Ikea chairs around it. One of the easiest ways to incorporate a bit of vintage into your house is to buy a classic old table and surround it with modern chairs.
Yesterday my husband and I went off on one of our favourite adventures. We were looking for something to use as a TV cabinet, but we didn't want a TV unit, we wanted something cool. We mapped out our route planning to hit 3 or 4 thrift shops before school pick up. At shop number two (which was a dud) we found ourselves across the road from thrift store heaven. It was a huge surplus store with ridiculously low prices. I found an old wooden crate from 1958 with SYDNEY printed on it that I really wanted but had no space for. My son loved the old wheels and telephones. There were tables and tapestry chairs, shelves and sideboards. Eventually we found what we were after, a 1950s display cabinet with glass sliding doors. It was even small enough to fit in the tight space we had for it.
The Irish owner was good fun. He saw our selection, nodded his head approvingly, then said "So, you're liking The Retro then?". We do like The Retro. We like it a lot.
$25 and two cans of white spray paint later we have a new TV cabinet. We've left the timber legs and veneer strip around the frame and have painted the door, top, and sides. It had a quick primer first using Zinsser odourless undercoat.
Incorporating The Retro into your home is easy and cheap. A good vintage piece will cost you a fraction of a new item from Harvey Norman or the like and it will retain it's value.
Here are my tips to get you started:
1. Have a browse through some design magazines to see what you like, or join pinterest.com and let your imagination go wild. Do you like 1960s teak or do you prefer the loud colours of the 1970s?
2. Google and ebay are your friend. Have a look at vintage pieces online. Check out Kartell, Parker, Chiswell, Noguchi, Eames.
3. Think about the function of your furniture and be creative. Your TV doesn't HAVE to go in a dedicated entertainment unit. You can remodel a china cabinet, small wardrobe, or cocktail cabinet and it'll do the same job while looking great.
4. Once you know what you like, map out the vintage stores in your area and make a day of it. Check ebay or your local secondhand websites regularly.
5. Don't overdo it. One or two vintage pieces in a room is probably enough. Make sure you balance it out with some new items and don't be scared to mix and match. My $8 armchair has an Ikea throw and a yellow cushion that I made out of upholstery fabric on it.
6. Tie it all together. My living room is linked by the use of yellow, grey, and white. Put something that links with the other items in your room on your vintage piece of furniture so that it looks like a cohesive design.
To my left is a vintage teak Parker cocktail cabinet that we bought for $60 from a Vinnie's store in Wollongong. To my right is an $8 armchair that I bought off ebay. Next to that is a noguchi style coffee table that we got off the side of the road. Around the corner is a 70s Chiswell table that I found for $30. All of that sounds like an awful lot of retro doesn't it? Here's a picture of our main living room which will show you how you can incorporate a bit of vintage into your room without looking like you live in a second hand store. All of our rooms are done on a tight budget and we rarely buy anything new.
In this room we have a few vintage pieces but we've balanced them out with some new items. The sofa is new but from a discount store and was bought for a bargain price. The rug on the floor was $49 from Ikea. The black and white cushion was from Target. The paintings on the wall are from our trip to Vietnam and they're framed in Target frames which were $15 each. The Parker is on the right and we've used white ornaments to link to the rug and our newest addition, a 1950s china cabinet.
Here is our $30 1970s Chiswell table with some $14.95 Ikea chairs around it. One of the easiest ways to incorporate a bit of vintage into your house is to buy a classic old table and surround it with modern chairs.
Parker cocktail cabinet found at Vinnie's for $60 |
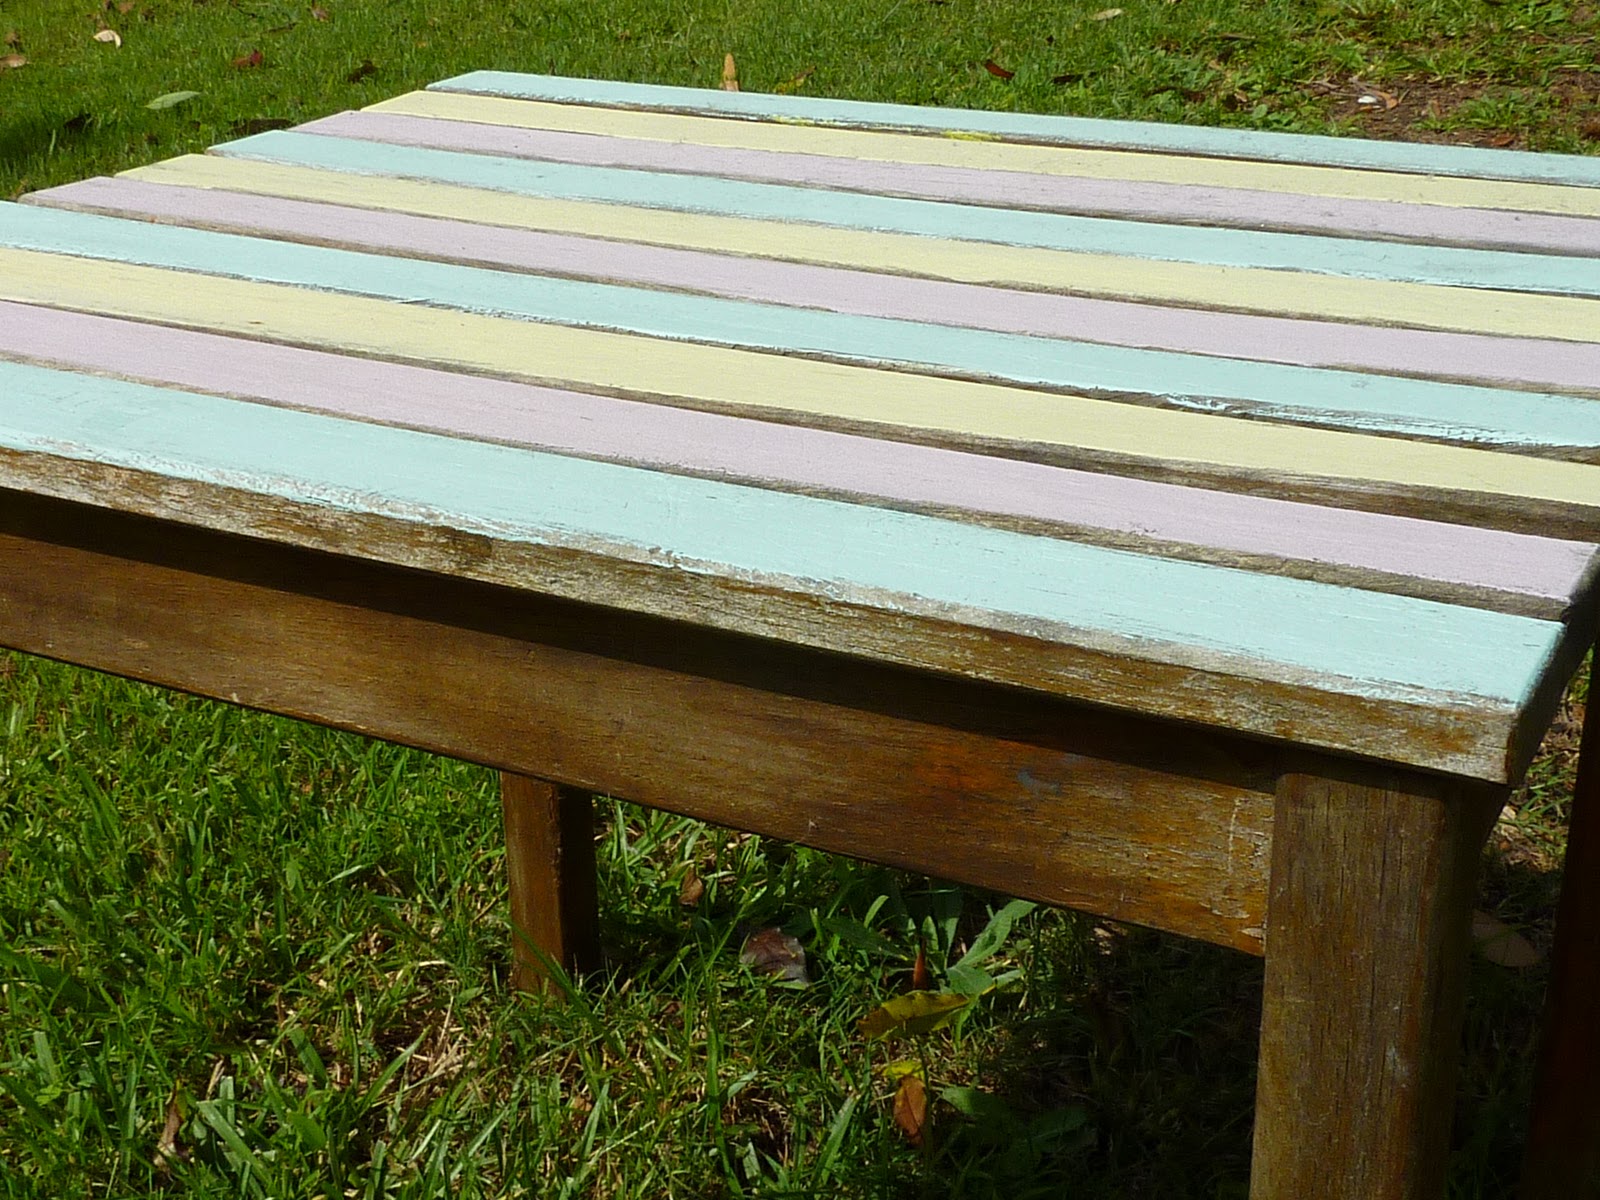
Freebie coffee table that we're using as an occasional table. |
Yesterday my husband and I went off on one of our favourite adventures. We were looking for something to use as a TV cabinet, but we didn't want a TV unit, we wanted something cool. We mapped out our route planning to hit 3 or 4 thrift shops before school pick up. At shop number two (which was a dud) we found ourselves across the road from thrift store heaven. It was a huge surplus store with ridiculously low prices. I found an old wooden crate from 1958 with SYDNEY printed on it that I really wanted but had no space for. My son loved the old wheels and telephones. There were tables and tapestry chairs, shelves and sideboards. Eventually we found what we were after, a 1950s display cabinet with glass sliding doors. It was even small enough to fit in the tight space we had for it.
The Irish owner was good fun. He saw our selection, nodded his head approvingly, then said "So, you're liking The Retro then?". We do like The Retro. We like it a lot.
$25 and two cans of white spray paint later we have a new TV cabinet. We've left the timber legs and veneer strip around the frame and have painted the door, top, and sides. It had a quick primer first using Zinsser odourless undercoat.
Incorporating The Retro into your home is easy and cheap. A good vintage piece will cost you a fraction of a new item from Harvey Norman or the like and it will retain it's value.
Here are my tips to get you started:
1. Have a browse through some design magazines to see what you like, or join pinterest.com and let your imagination go wild. Do you like 1960s teak or do you prefer the loud colours of the 1970s?
2. Google and ebay are your friend. Have a look at vintage pieces online. Check out Kartell, Parker, Chiswell, Noguchi, Eames.
3. Think about the function of your furniture and be creative. Your TV doesn't HAVE to go in a dedicated entertainment unit. You can remodel a china cabinet, small wardrobe, or cocktail cabinet and it'll do the same job while looking great.
4. Once you know what you like, map out the vintage stores in your area and make a day of it. Check ebay or your local secondhand websites regularly.
5. Don't overdo it. One or two vintage pieces in a room is probably enough. Make sure you balance it out with some new items and don't be scared to mix and match. My $8 armchair has an Ikea throw and a yellow cushion that I made out of upholstery fabric on it.
6. Tie it all together. My living room is linked by the use of yellow, grey, and white. Put something that links with the other items in your room on your vintage piece of furniture so that it looks like a cohesive design.
26. Craft Cupboard Stage 3 - Storage
It's finished! There's not much to add except some photos to show you how I used kitchen and bathroom accessories to store my craft bits and pieces.
On this door I used two wire spice racks from Ikea. We removed the handle and reattached it to the bottom of the rack so it could be used for ribbons. In between the spice racks is a magnetic knife holder with magnetic spice tins, also from Ikea.
For storage inside the cupboard I used glass candy jars and vintage tins.
On the other door we used a toothbrush holder from Bunnings to hold paintbrushes, and cup hooks to hang scissors, a ruler, and an embroidery hoop. A bulldog clip is used to hold patterns and loose pieces of paper.
Now for a breakdown of the costs!
Cupboard - Free
Wallpaper samples - Free
Primer undercoat $24.00
Taubmans enamel topcoat $29.95
Leftover white enamel paint - Free
Stencil book $2
Brushes $2.50
Shelves - $8 plus $2 for them to be cut to size
Shelf brackets $8
Spice racks, magnetic knife rack, spice jars, all from Ikea $30
Cup hooks and toothbrush holder from Bunnings $15
Clip for pattern $3
I hope the past three posts have inspired you to think outside the square when it comes to storing your craft.
25. Craft Cupboard Stage 2 - Paint!
Big moment - I finally got to slap some paint onto my cupboard. I've been researching what products would be best and I ended up buying Zinsser Odourless Primer. I'm so glad I did! One quick coat covered up the dark stain of the wood and made the job so much easier. In the past I've been too cheap to buy undercoat but it was so worth the $24.00 price tag. And I only used a small amount so it'll be good for future projects.
Once the undercoat was dry it was time to paint.
I chose Taubmans 'Blue Attraction' water based enamel with a satin finish for the job. I wanted a colour that was reminiscent of 1950s pastels and this soft turquoise colour worked perfectly. I was inspired by a piece of fabric that I found on Kelani Fabric called Central Park by Kate Spain.
After one application - pretty good coverage thanks to the undercoat. |
Once the whole thing had 2 - 3 coats of paint I left it to dry overnight then sanded back some of the corners and edges to give it a worn distressed look. I watched loads of YouTube clips on furniture distressing and most of them involved hurling a chain or a pair of pliers to damage the paint. I didn't want my cupboard to look too obviously distressed so I went easy on the sandpaper and just took a wee bit off.
Next up it was time for the stencil. I bought a wildflower stencil book on bookdepository for around $2 a while back.
Painting on the stencil is a job for a perfectionist pedantic type.. so I got my husband to do it!
I wanted the stencils to be a bit faded and worn so after dabbing on the white paint with a brush he dried it with a hair dryer then wiped off some of the paint with a damp cloth.
And here she is....
From this:
To this:
Total costs so far:
Cupboard - Free
Wallpaper samples - Free
Primer undercoat $24.00
Taubmans enamel topcoat $29.95
Leftover white enamel paint - Free
Stencil book $2
Brushes $2.50
Both paints have over 3/4 left so they'll be used for other projects.
Make sure you check back next week for my post on pimping out the inside. I can't wait to put all of the little storage bits and pieces I've been collecting to use.
23. Craft Cupboard Stage 1 - Wallpaper Collage
Time to realise the Craft Cupboard dream! In June we had our council clean up collection and across the road from our house I spotted this 1930s cabinet. It was in a pretty sorry state.
It was only after we got it inside that I realised that it's almost exactly like the craft cupboard I have as my dream storage space on my Craft Cupboard Page. Since then I've been researching different paint techniques and storage options and today I made a start on my craft cupboard restoration.
I found some vintage wallpaper books (also in the council clean up) and I decided to use them to do a patchwork collage on the back wall.
I cut out squares of different sizes, making sure to keep my colour palette limited to blue, yellow, and white.
Once I had a pile of squares I glued them onto the back of the cabinet, starting with the largest pieces first. I kept the shiny silvery coloured ones to add as the top layer.
The wallpaper pieces were prepasted but unfortunately the glue no longer worked since they were so old. I used PVA first and then a glue stick to stick down any stray edges.
This technique can be used on any furniture, it would look great on the front of a chest of drawers or on a table top and then covered with a sheet of glass or even varnished.
So far my costs are at $0.00.
Check back next week for stage 2!
22. Tablecloth Pouffe
Remember the tablecloth I found at a thrift store a while back? Last night I transformed it into this pouffe. It looks more complicated than it is - the sewing part is all straight lines and the tufting/button is really simple as long as you have the right tools. When I was growing up we had a pouffe made out of multi coloured wedges of vinyl. It's still at my mums place now - it's a favourite with the grand kids for watching TV or sitting down for a snack. Only we didn't call it a pouffe. In my family it's known as "The Humpty" and no-one knows why!
Whatever you want to call them, these nifty little pieces of furniture are making a big comeback. They're perfect for propping up tired feet or for a little person to sit on to watch movies. With winter closing in around us now is the perfect time to spend an afternoon in front of the sewing machine making this very satisfying little number.
Cost: Under $30
Time: An afternoon
Materials:
1 large vintage tablecloth in linen or other thick and durable fabric. Mine was 1.25m square and I fit all of my pieces in with some left over.
500g hobby fill stuffing - $7
2 large buttons $4
1 long upholstery or mattress repair needle $3
2 metal washers, slightly smaller than the buttons .50c
Upholstery thread or fishing line $3
Normal thread, sewing machine, scissors, pins
Here we go...
The first step is resizing and printing your template for the wedges that make up the pouffe. I followed the tutorial on Design Sponge where there is a PDF template. I inserted the image into Word and re sized it before printing it.
Cut out 24 wedges out of your fabric. Design Sponge recommends cutting 24 wedges out of muslin and sandwiching them onto the back of the fabric to prevent stretching. I didn't bother as I felt that my fabric was durable enough but it is worth considering if you have a lighter fabric.
Once you have your 24 wedges lay them out in two circles of 12 wedges each and have a play with placement and design.
There is an excellent series of images and instructions on how to make the pouffe on the Design Sponge Tutorial. I doubt I could explain it any better so I won't repeat them all here.
Sewing the wedges together was a bit monotonous for a "make it up as you go along" person like me, but I just love the end result. Slightly bigger pouffes would look fantastic in an outdoor living area as outside cushions. I can also see them looking great in a kids room made of bright fabrics with big plastic buttons.
Have fun everyone and enjoy the coming weekend!
4. Side Table in 1950s Stripe
Time: Under 30 minutes
Cost: Under $20
We found this outdoor table on the side of the road last year and I decided to make a bedside table for our room out of it. Outdoor tables often have slats of wood on the tops which are perfect for painting in a multi coloured stripe design. The timber is usually quite weathered which I love the look of.
Materials:
An old table, size and height to suit your space
Paints. I used Taubmans Paint tubes which are fantastic. They have a sponge applicator on the end of the tube so all you have to do is squeeze and run the sponge along your surface. So easy and no brushes to wash up! Mine were $5 each from Bunnings Warehouse.
Here we go....
Clean your table with a brush or soapy water if it's very dirty. Leave to dry completely before painting.
Set up your painting spot and begin by painting your first slat at one of the outer edges. Keep painting using a pattern of colours. I suggest no more than 3 colours, and try to stick to a similar colour palette. I used three soft pastel colours in lemon, aqua, and mauve that I chose after doing some googling on 1950s homewares.
Easy peasy and loads of fun!
2. Recycled Screen Headboard
Time: 2 hours tops
Cost: Under $20
This project is about thinking outside the square and being a bit creative. My husband found three of these Balinese screens on the side of the road during last year's council hard rubbish/inorganic collection and he snapped them up. One of them is being used as a temporary fence to keep the kids in the backyard, one has been broken into pieces for future projects, and this one was kept whole.
It was on the wall for a while and then we decided to make it into a headboard for our bed. Here's how we did it.
Materials:
- 1 long piece of wood. This could be a rustic old door, an old sign, a table top, or a screen like we used. Get out to your local salvage yard and have a look around, you're limited only by your imagination!
- Leftover paint. We bought some white enamel from the mis-tint section at Bunnings for around $6.
- Paintbrushes
- Recycled mirrors, tiles, or glass.
- Glue or double sided foam tape ($5)
Here we go...
Clean your timber with a stiff brush, wash and dry if necessary.
Give the whole thing a good coat of paint if you wish to, or leave it natural. If you like a distressed look you could wipe some paint over the timber with a rag. We decided to stick some pieces of mirror onto the back of the screen so you can see it through the lattice design, we attached the pieces using double sided foam tape which you can get from a hardware store. Old tiles would look fab, or you could use pieces of vintage china, glass, or fabric glued onto plywood squares.
Next step is securing the headboard to the bed. We have a mattress and base so we just needed to add a piece of wood on either side of the bottom of the screen so that it sat at the right height, then we pushed the bed up to the wall with the screen behind it.
So there you have it, a budget friendly and one of a kind headboard that will give your bedroom a touch of the exotic.
Subscribe to:
Posts (Atom)